An Introduction To Jewelry Making
Jewelry. Humans have been adorning themselves with it for thousands of years. In fact, jewelry is one of the oldest types of archaeological artifacts, with 100,000-year-old beads made from Nassarius shells thought to be the oldest known jewelry. But the first signs of established jewelry making didn’t happen until around 3,000-5,000 years ago in Ancient Egypt.
Since then, much has changed, yet much has stayed the same. Whether you call it jewelry in the States, jewellery in the UK or jewelery elsewhere, these accessories make a statement, indicate status and showcase personal style.
Forget items being cranked out by the thousands (or millions) at a factory. There’s something much more satisfying in creating your own jewelry designs to sell or even use to promote a brand. Hand-made, one-of-a-kind jewelry pieces forge style and sentiment into a single, unique DIY accessory that has a story to tell.
Like with any good story, we must start at the beginning: The Fundamentals. This jewelry making for beginners guide will show you how to make jewelry that is functionally sound, aesthetically pleasing and professional looking so that you can not only confidently sell it to make a profit or use it promotionally but also proudly wear it yourself or happily give it to friends and family.
Jewelry Making Tools
Many of us had our first jewelry making experience in elementary school by weaving friendship bracelets. They’re inexpensive, easy and require no tools. But there are limitations to style and sophistication.
Opposable thumbs are great for simple projects, but they don’t cut it when hundreds of tiny parts must be threaded together. Plus, fingers are only so strong. Making jewelry should be fun, not painful. Enter tools.
In jewelry crafts, tools are used in a number of applications for holding and manipulating materials, including tasks such as bending, folding, cutting, attaching and finishing.
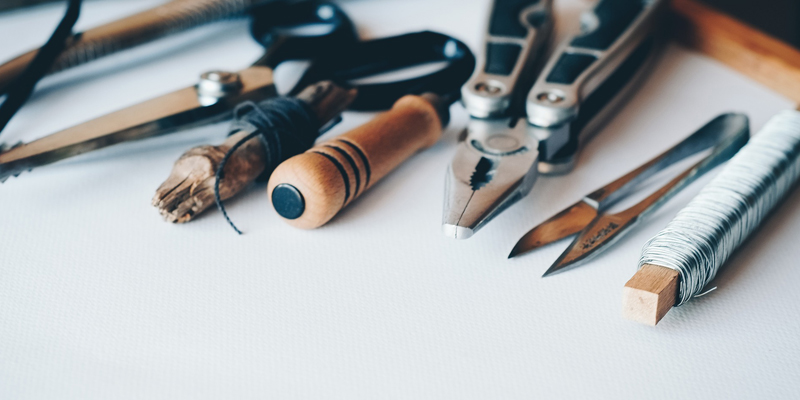
In the beginning, you’ll need simple hand-held tools such as wire cutter and pliers. But don’t head out to your dad’s/grandpa’s/uncle’s/brother’s/ husband’s (or wife’s) toolshed. Jewelry tools are a bit more specialized than what you’ll commonly find around the house to fix the plumbing.
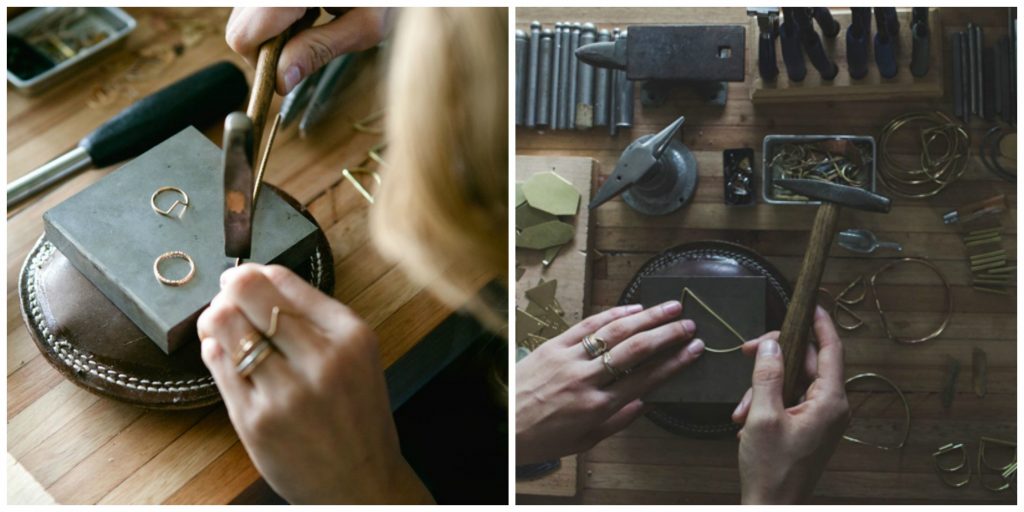
To get a sense of what jewelry tools look like, jump in behind the scenes of Hannah Ferrara’s work profiled on Renegade Craft Fair. Her Asheville studio, located in the mountains of Western North Carolina, is just as beautiful as the jewelry she creates in it.
To get you started, this tools tutorial at The Spruce helps you dive right into the basics: Wire cutters, round nose pliers, chain nose pliers, flat nose pliers, crimping tools and bead stoppers. Why so many implements to perform seemingly basic tasks?
In the process of making just one piece of jewelry, there are typically multiple steps that require specific tools. Pliers are most commonly used to attach fasteners, chains and the like as well as manipulate parts. Each style is suited to a specific function, so using the right one is key. Gotta have the right tool for the job.
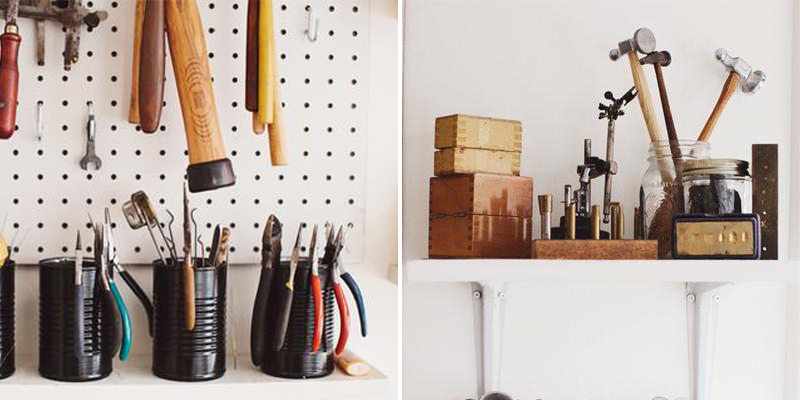
Take a glimpse inside the studio of Scandinavian jewelry sculptor Karin Best and you can see that she’s got all the tools necessary to make her amazing designs for Kajs Jewelry.
While having a sound set of jewelry making tools is an investment, you don’t have to break the bank. But don’t go totally cheap, either. Get a quality set of tools that will perform and grow with you as your jewelry making skills increase. They’ll make the work easier and finished products look amazing.
To see many of these tools in action, check out this how to make jewelry tutorial from the London Jewellery School:
As the name suggests, laser cutting is a technology that uses a laser to cut flat sheet materials. Like most tech, when laser cutting first came on the market ages ago, it was expensive and limited to large companies.
Today, laser cutting has become much more accessible. With advances in technology, the cost has come down so that owning a laser cutter, isn’t a pipe dream for serious makers who do a lot of volume.
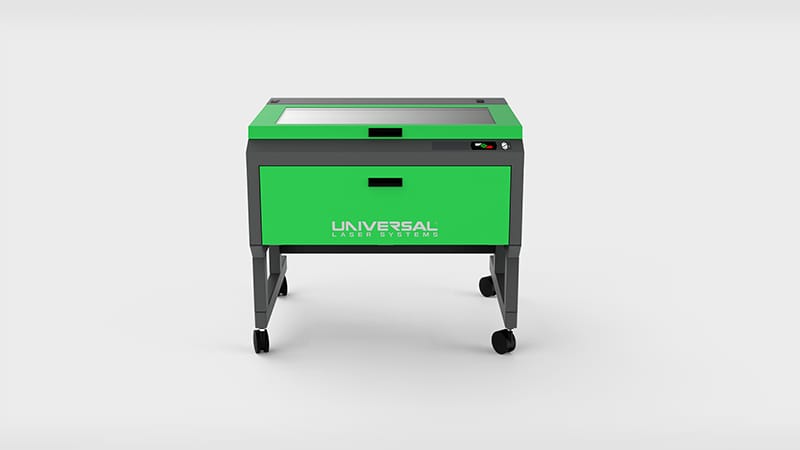
But for most makers (especially beginners who want to test out the tech), it’s possible to utilize the tool without having to buy one such as this one from Universal Laser Systems. Makerspaces and laser cutting services are now available on a per-job basis to any designer or agency, making it more economical to laser cut parts in small batches via a service rather than buying the machine outright.
Unlike hand crafted parts that you labor over for hours just to get one unit, laser cutting enables a single design to be cut over and over again in minutes—all with sub-millimeter precision every time. The laser also cuts in such a way to leave an edge with a high-quality surface finish that requires little, if any, additional finish work by hand.
But one of the best parts about laser cutting is the freedom to create unique shapes and custom engraved parts. This is especially important not only if you’re selling your items but also if you’re creating merchandise to promote brands. Either way, you want to be different from competitors, and laser cutting allows you to create truly custom products.
Laser cutting does have limitations, however, especially when creating ornate three-dimensional shapes. So for even more complex and interesting forms, consider 3D printing.
When 3D printing, machines take the information from your digital files and create solid parts either by depositing material or joining material together. This is quite different from most traditional manufacturing methods for solid parts because it’s additive rather than subtractive.
What does this mean? Rather than traditional methods of cutting or filing away from solid pieces (subtracting areas until the desired shape is revealed), 3D printing builds shapes directly from the substrate materials, adding more and more substance until the desired figure is formed.
What’s great about this manufacturing technique is that you can do things that weren’t possible with old school methods, such as chainmail patterns and interlocking parts. You can also make the same part over and over again from the same digital file as well as make edits to the form between prints.
There are numerous types of 3D printers on the market, and not all work in the same way. Some melt material and deposit it, some use lasers to harden and bind material, and some use light to set materials. Going into the mechanics of each fabrication method is beyond the scope of this article, but you can take a deeper dive here if interested.
For the beginner to average designer or agency, it makes economic sense to use a 3D printing service. But for heavier uses of this kind of tech, it’s possible to have your own 3D printer for a couple thousand dollars. And compared to laser cutters, 3D printers are generally more home-friendly because they don’t have the same fire risk or require the level of precision that lasers do.
For those who are making enough 3D forms to invest in their own machine, Ultimaker is a popular choice because of the reasonable price, company values and commitment to remaining open source.

Getting into laser cutting or 3D printing jewelry can be intimidating because these machines are far more complicated to use and expensive to buy than basic hand tools. But this doesn’t mean that beginners can’t play; just start by outsourcing your designs to a service that will cut or print your products before making the big investment.
Jewelry Making Techniques
What technique is best for making jewelry? It depends, of course!
The kind of jewelry you’re making (necklaces, earrings, rings, bracelets) + the kind of materials you’re using (wood, metal, plastic, leather) + the shape of the pieces (round vs angled, flat vs three-dimensional) + the size (small vs large) determine what techniques you should use to create a beauty you can’t wait to show off.
Let’s look at the most popular jewelry making techniques you can use for your next DIY project:
Techniques For Connecting & Assembly
Unless you’re making a solid piece (think ring or bangle), there is typically one constant when making jewelry: You must connect and assemble all the individual components to create the finished design. Here are some of the most used techniques:
Jewelry Knotting: Most often used in beadwork, knotting plays an important role both functionally and aesthetically. Knowing which is the right knot to use and making it correctly make your beadwork last longer because the strands won’t unravel.
Depending on the stitch you are using, the kind of thread and bead sizes, the type of knots used can vary. This tutorial at The Spruce covers five knots for beginners: The overhand knot, the square knot, the surgeon’s knot, the half-hitch knot and the lark’s head knot.
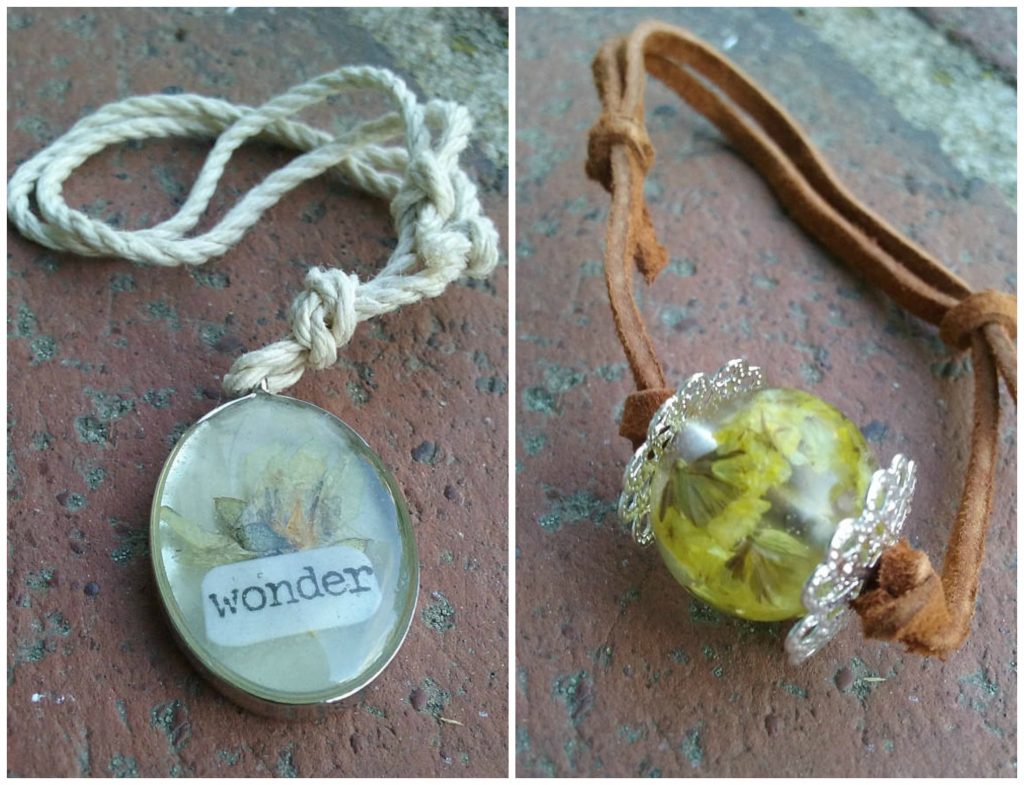
Etsy seller farmgirlflorals uses an adjustable slip knot for the bracelets she creates. Here, she uses rope and leather plus hand-made clear resin beads with suspended flowers grown on her farm in the southern coast of Massachusetts. So pretty.
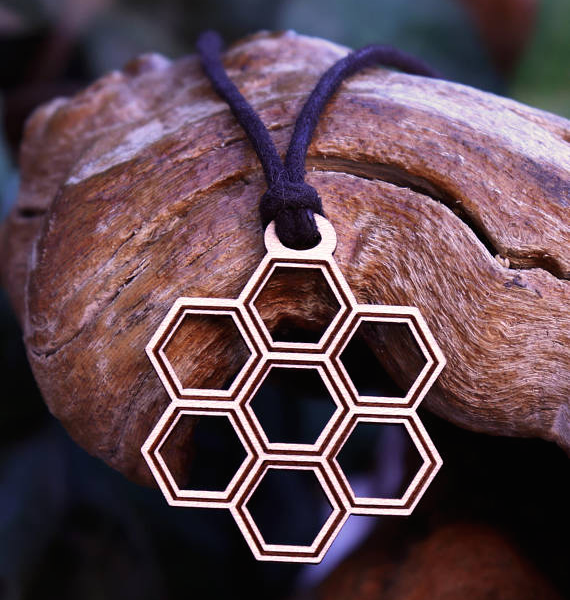
You can also use knotting applications with digitally produced objects, such as how Etsy seller Leahinc uses a slipknot to make the black waxed cotton cord adjustable on this laser cut honeycomb necklace.
To see some knot making in action, check out this video tutorial from Eclectic Designs that covers not only the overhand and surgeon’s knots but also the double and sliding knots. And check out this Craftsy tutorial on how to make a simple three-knot bracelet.
Jewelry Stringing: Bead stringing is one of the core, fundamental skills in jewelry making. While it seems as simple as putting beads onto a string or wire, there’s a bit more to beading jewelry than that. Understanding how to properly string (no thread!) gives you the foundation to build upon your jewelry making skills.
To get the basics down, check out this five-part video tutorial series from Beadaholic. Part 1 dives into the different types of beads (man-made vs natural), the various shapes (round, bi-cone, tube, square, disc, barrel, etc.) and bead size. Part 2 is all about findings: Everything from bead caps and cones to clasps, headpins, strand reducers, links, earring hooks, bezel settings and more. Part 3 talks stringing materials, and Part 4 covers the essential tools you’ll need to properly bead jewelry.
The series concludes by putting all the fundamentals learned in the first four videos into practice for Part 5: Making A Bracelet.
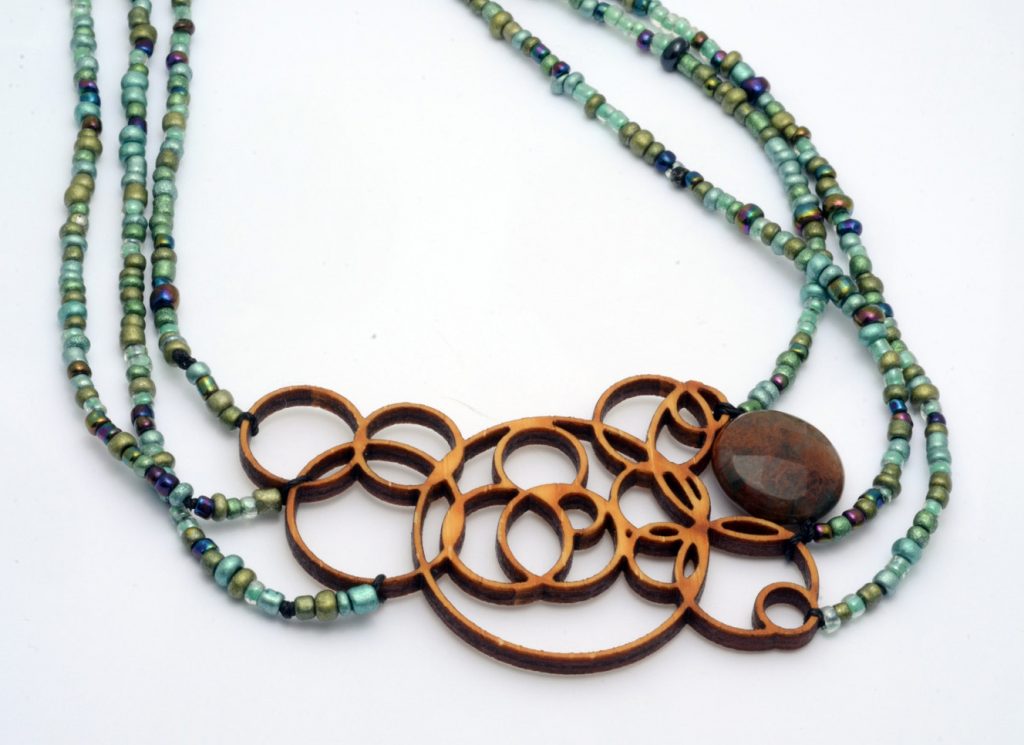
While beading on its own is pretty, combining beads with laser cutting is pretty remarkable—especially when selling your designs like Etsy seller Melanie Lynn.
Jewelry Looms: And if you really want to have some fun while making the task of joining beads a bit less tedious, try using a jewelry loom. These nifty little contraptions allow you to set up a framework for stringing beads both horizontally and vertically in a grid to produce wider sections than can be achieved with individual strands.
By incorporating various colors, materials and styles of beads, you can create interesting geometric patterns. Add even more sophistication by incorporating interesting finishes and clasps.
To get started, check out these 10 things you must know for using a bead loom from Interweave.
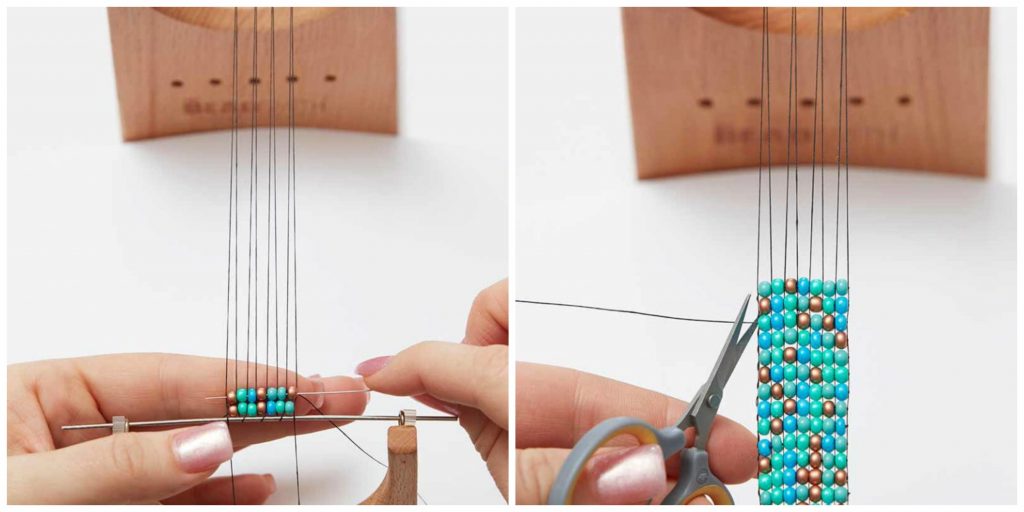
In addition to the mini-tutorial, Interweave also has a video class on getting started with bead weaving. You can also find some easy-to-follow tutorials on YouTube like this one.
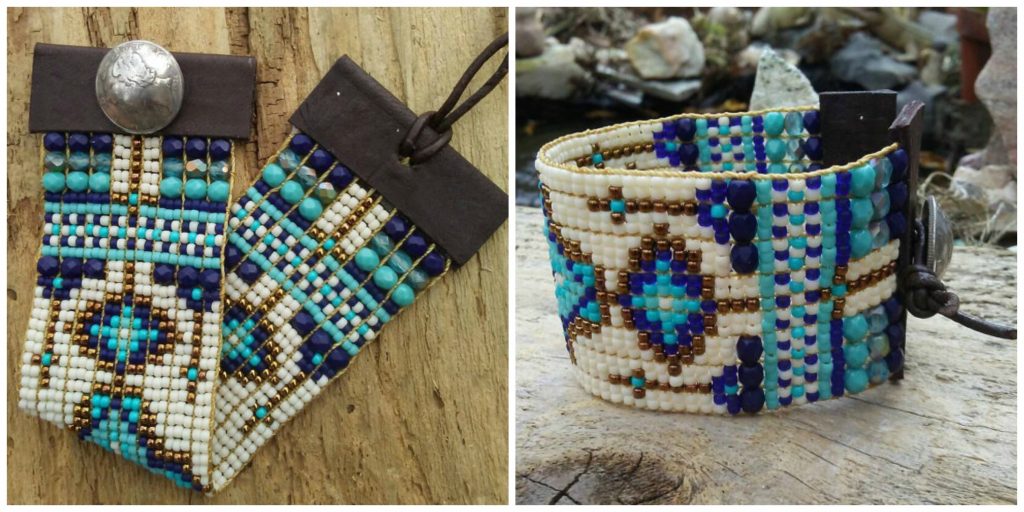
For some inspiration, check out this boho beaded bracelet from Etsy Seller Adornments925 that was woven on a loom. She combined Czech glass and Japanese seedbeads, then finished it off with genuine recycled leather and a handmade vintage Mercury Dime button. Gorgeous!
For even more jewelry making inspiration, look for the techniques above in the artistic pieces created by Erika Price as well as Linda Blatchford at Linor Store.
Making Solid Parts And Pendants
Most beginning jewelry artists should be able to find the supplies they need at retail. (Craftsy’s favorite jewelry supply vendors and IndieMade’s 25 best jewelry making resources can get you started.)
But sometimes buying retail isn’t an option. Maybe you can’t find the components you want off-the-shelf. Or maybe your creativity is firing and you just want to make one-of-a-kind jewelry pieces. To make your own solid parts and pendants, however, you’ll have to break out more heavy-duty tools or molds.
If you’re working with a single material such as wood or metal, for example, you may need to cut away parts with a saw or drill to get your final shape.
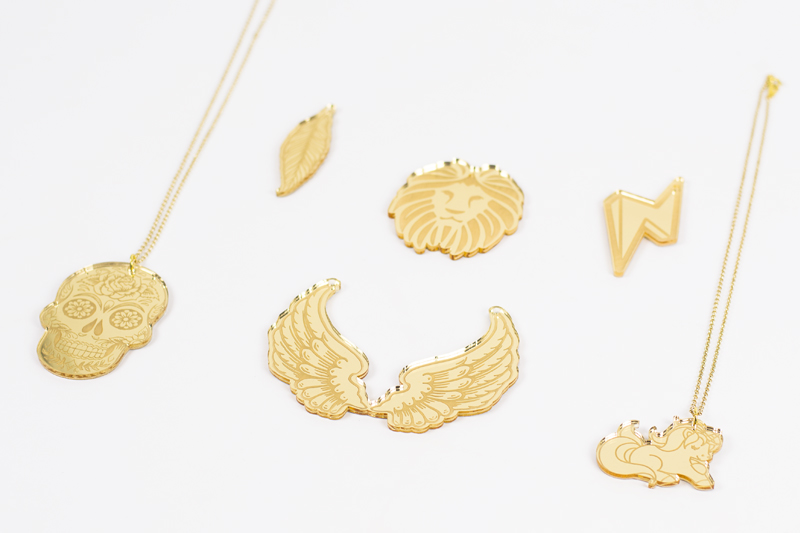
For intricate details, or if you’re looking for consistency because you’re making jewelry to sell or use as a branding tool, then laser cutting is your BFF. Just look at how slick these gold mirror acrylic pieces are.
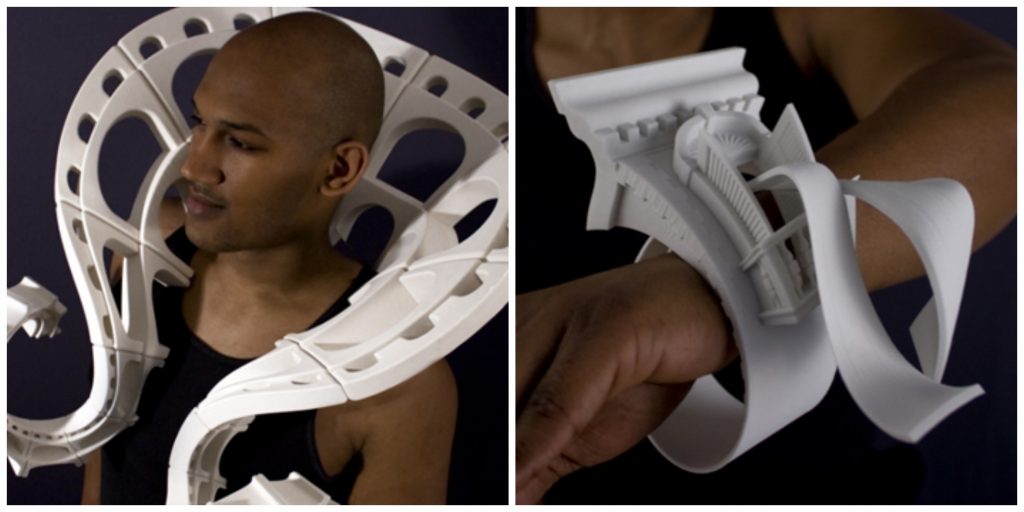
For even more complex shapes, 3D printing can be your best bet. Artist Joshua DeMonte has taken the concept of 3D printing jewelry to the stratosphere. Are his creations architectural jewelry or sculpture? Or both? You decide.
But what if you’re creating mixed-media jewelry? Then jewelry resin is the way to go. Resin is like Jello for your jewelry. It malleable for a short time and then sets into a solid shape. But unlike that fruity gelatin dessert, resin cures and hardens completely to safely protect whatever it surrounds. (And you definitely don’t eat it!)
While used for resin casting, it’s actually more popular for sealing images (ticket stubs, love letters) and/or found objects (fabric scraps, buttons, coins, feathers) in bezels to create handmade resin jewelry. It may sound complicated, but these wearable mementoes aren’t that hard to make. To get started, check out this DIYnetwork tutorial as well as this Interweave tutorial that will help you select the right resin for your project and then walk you through the steps to make resin jewelry.
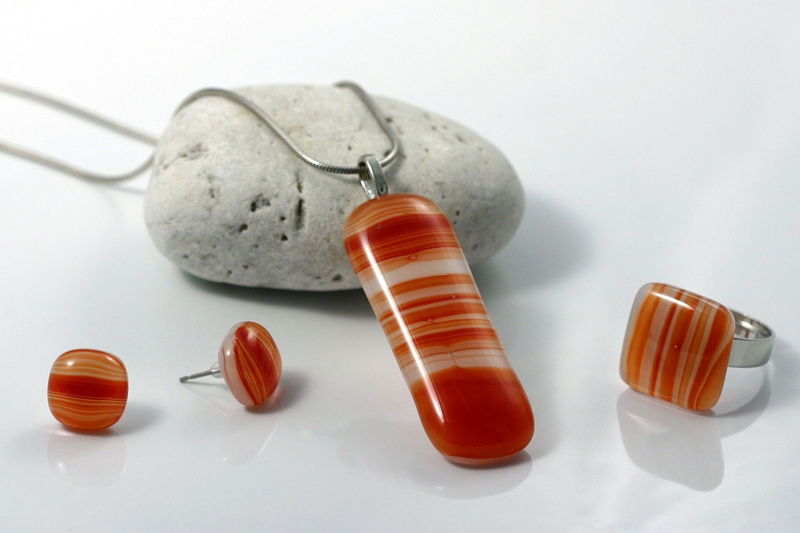
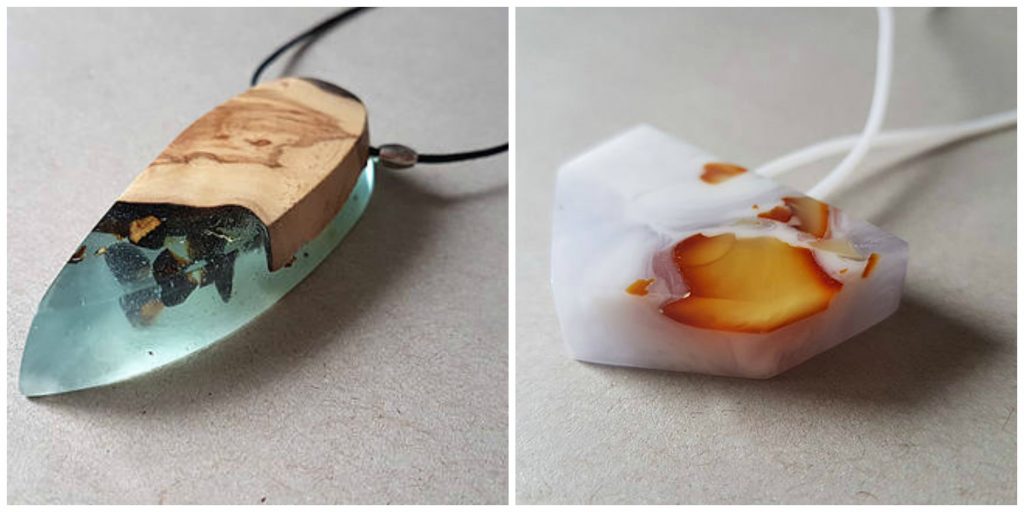
Inspired by nature, Etsy seller vingart has a line of resin jewelry that’s “full of colors, shapes, inner vibrations and natural beauty—all enclosed within a glass imagination of shapes, artistically dyed and colored with dreams.” She combines olive wood with white-blue-transparent resin and amber to create the pendant on the left, while white-light-violet resin is used in combination with orange amber to form the necklace on the right.
Pretty amazing, right? There really is no limit to jewelry making—other than your imagination.
Finishing Touches
Do you like cake? We do. Especially lemon. And while it’s good just as is, what makes it extra tasty is the icing. That finishing touch makes the cake go from average to amazing. Guess that’s why the saying “icing on the cake” exists.
When making jewelry, how are you going to add some icing to make it really stand out? Sanding, buffing, applying resin and painting jewelry are all ways you can give your pieces that extra something special.
With painting, it’s usually more sophisticated than just grabbing a paintbrush and slapping it on. There are a number of considerations when painting jewelry:
- What is the material/surface?
- What kind of paint, ink, etc. works best for this material?
- How much area will be painted?
- What kind of tools work best for the kind of paint and the size of area? This could be a brush, dropper, paint dabber (yep, that’s a thing; kind of like a sponge, but better), etc.
Once you’ve made the above determinations, it’s time to start. Prep your surface, then mask what you don’t want painted. Then get to painting! And give it plenty of time to dry. Of course, follow any manufacturer’s guidelines for whatever finish you are applying.
Need a project idea? Check out this DIY bohemian suede fringe necklace over at Made In A Day.
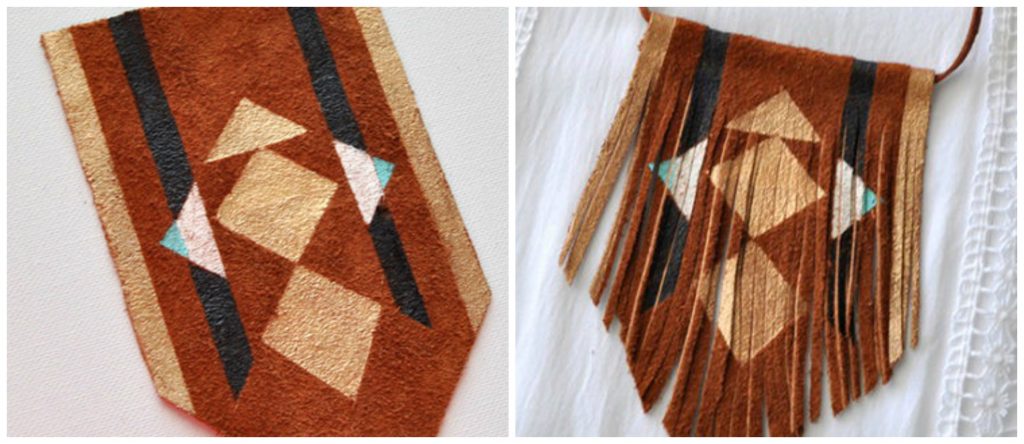
In the tutorial, you’ll find the list of supplies and the step-by-step instructions to make this on-trend boho statement necklace. What a fun way to spend the afternoon!
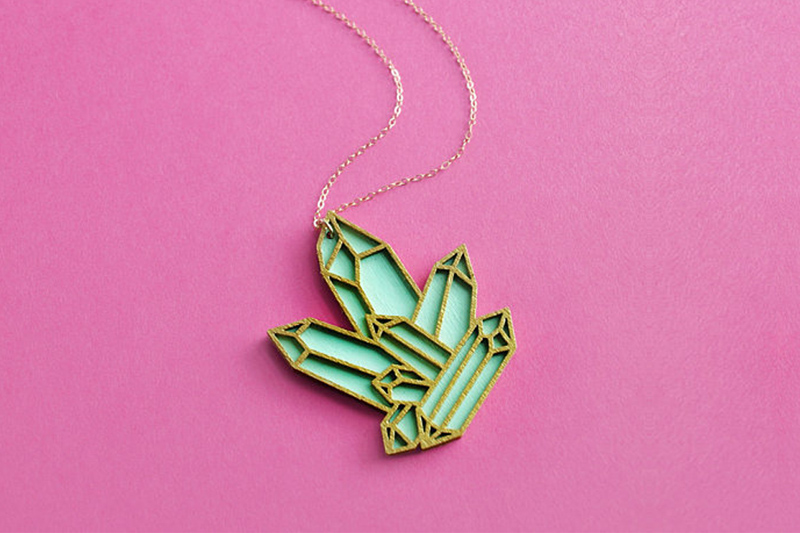
For an idea of the kinds of painted jewelry selling on Etsy, check out Galactic Affair. Maker Rachel Buske took what she learned as a fashion design major and turned it into a business for those who want to revolt against fast fashion. Here’s a laser cut wood pendant that’s been hand-painted with acrylic paint to showcase the details of the crystal pattern.
Putting The Techniques To Work
With all the different ways you can approach jewelry making, it’s easy to get overwhelmed. Don’t feel like you must master everything before beginning. Jewelry making for beginners is kinda like on-the-job-training. Jump in with both feet, have fun and see what happens.
When you get stuck and need some help, Fusion Beads has a hefty tutorial series that covers 36 jewelry-making topics. Whoa! These step-by-step tutorials can help you master basic beading, stringing, wire working, bead weaving, metal working, mixed media and so much more. Each technique page has a list of materials and tools needed, plus helpful tips and tricks. Definitely one to bookmark.
Jewelry Making Materials
In addition to the foundational supplies for making jewelry—wire, jump rings, clasps, resins, etc.—there is a wondrous world of jewelry making materials available. When deciding on your materials, consider the following:
- What look do you want to create aesthetically?
- What materials do you have on hand or what items do you need to source?
- How easy is the material to work with?
- How does the material fit into your budget?
To give you a feel for what’s available (beyond all the beautiful beads, of course), let’s look at four of the most popular materials: Wood, Acrylic, Metal and Leather.
Making Wooden Jewelry
Wood brings a natural aesthetic to any jewelry project. There are so many types of wood, each with their own characteristics. The color, shape and grain make each piece of wood unique and visually interesting.
You’re most likely familiar with ash, bamboo, birch, cherry, maple, oak, pine and walnut. But there are exotic woods that are ideal for wood jewelry such as ebony, koa, lacewood, purpleheart, redheart, rosewood, tulipwood, wenge, zebrawood and zircote. Because of their dramatic colors and grain patterns, these exotic woods are beautiful choices for wood jewelry not only for their cosmetic appearance but also for their wood working attributes.
In terms of benefits, wood is a sturdy material that lasts much longer than many other jewelry materials that may crack or fade over time. It can also withstand decorating techniques such as wood burning, laser engraving, dye application and painting that often aren’t possible with other materials.
Of course, there are all kinds of wooden beads in every shape and size imaginable. And if you’re handy in the shop, you can cut your own designs from a sheet of wood. Go for it!
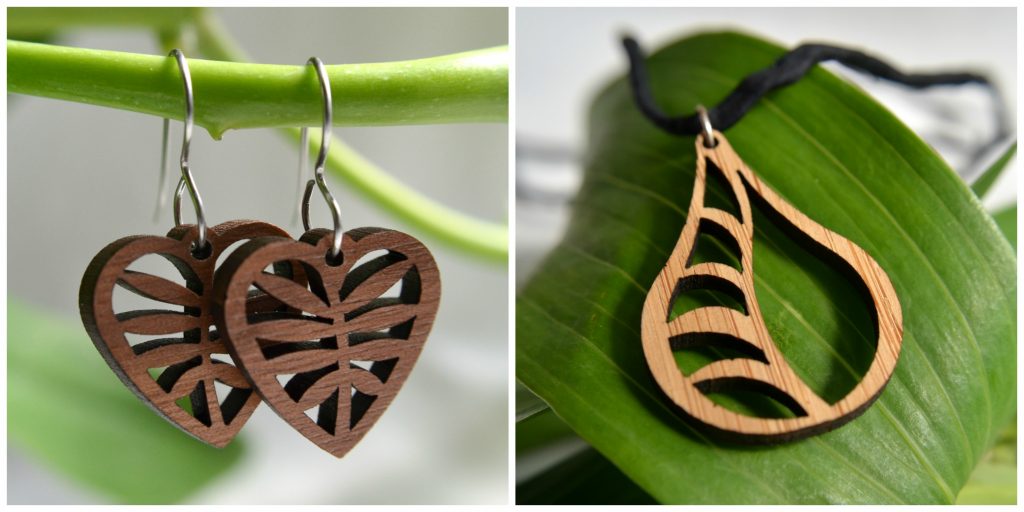
For Jessica Giovachino, a practicing architect and jewelry designer at GioGio Design, wood is one of the primary materials she uses for her jewelry creations. Nature and architecture are her main inspirations, and she seamlessly blends the two together as you can see in these wooden earrings and pendant.
Need some inspiration on how to make wooden jewelry of your own? Check out these awesome wood projects, all of which have a DIY tutorial. Sweet!
Making Acrylic Jewelry
Plastic fantastic! Making acrylic jewelry is pretty fun because not only does acrylic come in all sorts of forms but there are many colors available, too. As a thermoplastic, acrylic can be melted and set into all different kinds of shapes. It’s also soft enough to be cut and sanded by hand if you so choose. Like wood, there are acrylic beads o’plenty.
Acrylic also laser cuts pretty sweetly. While most laser-cut acrylic jewelry is a standard 2D shape, UK jewelry artist Lynne MacLachlan has given her designs a completely new shape. Literally! Her dynamic jewelry gives wearable art new meaning. Check out this intricate 3D laser cut bangle bracelet:
If you want to see how to make acrylic jewelry, check this video by The Art League that demonstrates cutting, shaping, gilding and welding pieces of acrylic to create jewelry.
Metal Jewelry Making
Ever thought about making metal jewelry, but been scared off by the term metalsmithing? Don’t worry, it sounds far more intimidating than it is. Really, metalsmithing is simply the art of forming and fabricating metal into jewelry. It doesn’t necessarily involve red-hot parts, although it can if you want to!
While gold, silver and platinum are most often used commercially, artisan jewelers and metalsmiths typically work more with silver, copper, gold and, occasionally, a little brass or bronze.
For a glimpse inside the world of metalsmithing, check out this introduction at Interweave that explains basic metal fabrication tasks such as annealing; cutting, drilling and sawing; filing and sanding; forming; joining; and finishing.
Keep in mind you will most likely want to finish the edges and polish the surface of any metal jewelry. This tutorial walks you through the entire process of filing and finishing metal like a pro.
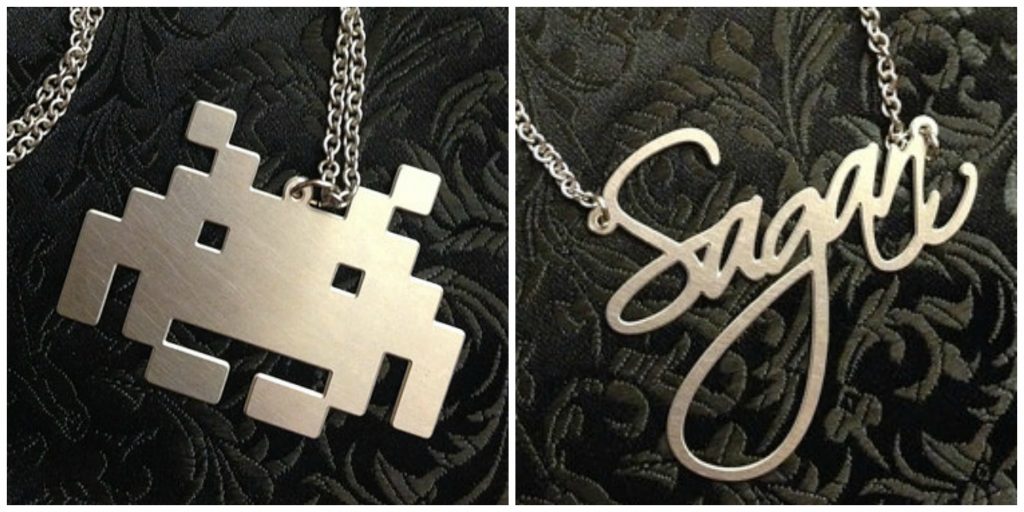
If you don’t want to do all the hard metalsmithing work yourself, you can get metal parts laser cut like TheMoonLab does. Her line uses stainless steel to create relatively simple designs that combine pop culture, science and spirituality.
But your metalwork doesn’t have to start from scratch. You can take existing metal, such as vintage coins, turn it into cufflinks like these that are adorned with Swarovski crystals.
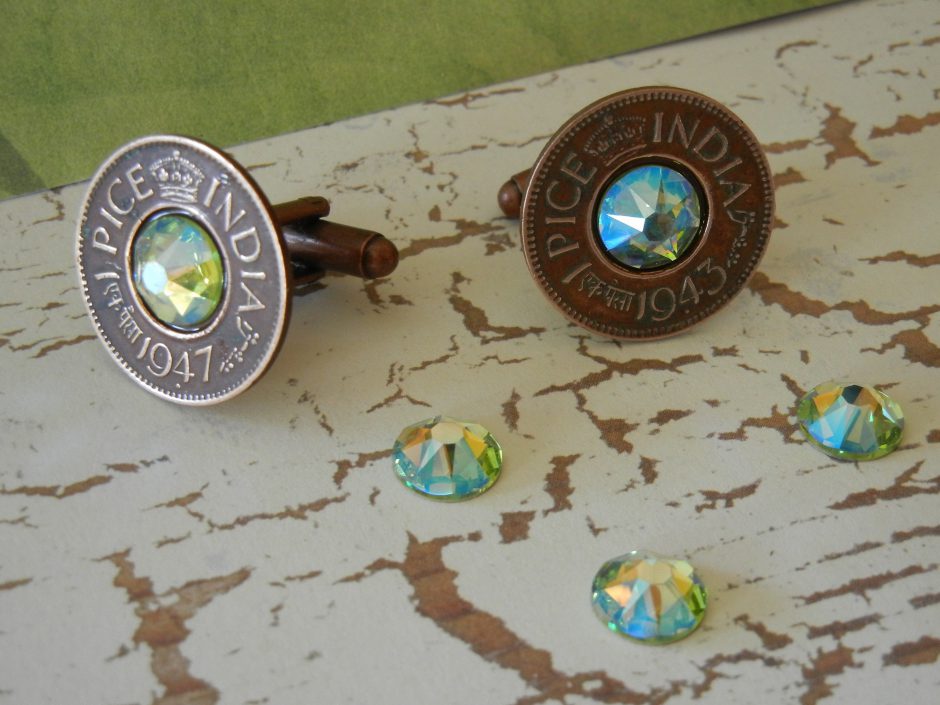
They make excellent groomsmen gifts, ensuring all of your “best men” have a memorable keepsake of the big day. Get the tutorial here.
Need some project ideas to get started with metal jewelry making? Check out this tutorial on two cool metallic bracelets you can make yourself. One has spikes, one has chains, and both are great for layering with other jewelry.
Making Leather Jewelry
Nothing synthetic can quite compare to the feel and the unique quality of leather. It is such a luxurious material to work with because it has undeniable character and a soft, supple feel.
You may think of leather and suede being used as cords for hanging pendants. But there’s so much more you can do with this versatile material.
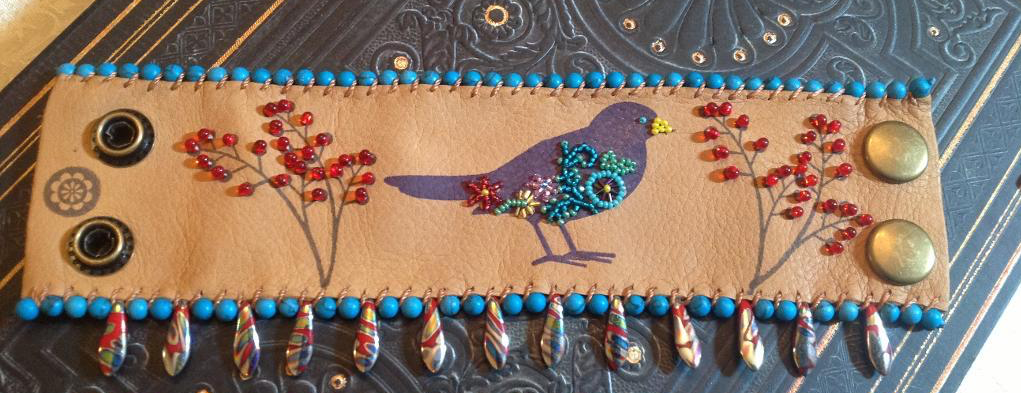
Being flexible, leather conforms to the body to give a great fit once worn—making it especially suitable for bracelets and cuffs. This leather cuff is not only stamped but it’s also adorned with beads and metal snaps. Oh snap!
And here’s the good news: You can make your own. Get the tutorial from Craftsy and check out 10 other tutorials you can try. For some additional insight into what it’s like to make a leather cuff, check out this video.
Leather’s flexibility also means you can work a flat leather sheet into a dimensional design. Check out these necklaces—plus 30 more leather jewelry ideas—at Brit.co.
What about laser cutting leather jewelry? Oooooh yeah. The Geo Leaf statement necklace from Etsy seller DouryAccessories showcases how geometric shapes can be designed into beautiful bridal jewelry. In addition to being laser cut, this necklace is then individually hand foiled, meaning each piece is unique and unlike any other.

Loving the look of leather? To get started making leather jewelry, check out these tips.
Making Earrings
If you’re a beginner and just learning how to make custom jewelry, earrings are a great place to start. Why? Making earrings are generally smaller in scope than other types of jewelry. Plus, they’re typically a quick and easy DIY jewelry project.
Some basics to consider:
Style: Most earrings fall into five basic styles: Stud, dangle, drop, hoop and chandelier. You can buy pre-made metal hoops, hooks or studs, or you can make your own. It all depends on how you want the earrings to fit on the ear as well as the overall finish desired. Hand-made hooks may not have the perfect curve of the manufactured ones, but this one-of-a-kind look may be exactly what you’re after. Also keep in mind that many people have sensitive ears, so select metal accordingly. Sterling silver is a good choice if there are sensitivity concerns.
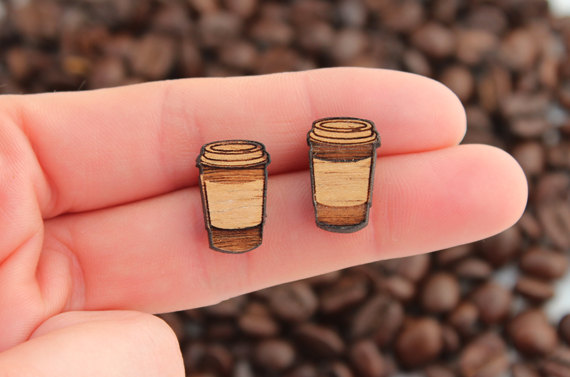
Materials:You can use just about anything to make earrings. Attach beads to a French hook using wire or headpin for a simple dangle. Glue a bauble directly to a stud. Have lots of fun by using found objects such as feathers, buttons or small metal parts. Take things a step further by laser cutting your own parts to make acrylic earrings or wooden earrings such as these coffee latte cup studs from Etsy seller SconnieAndJam.
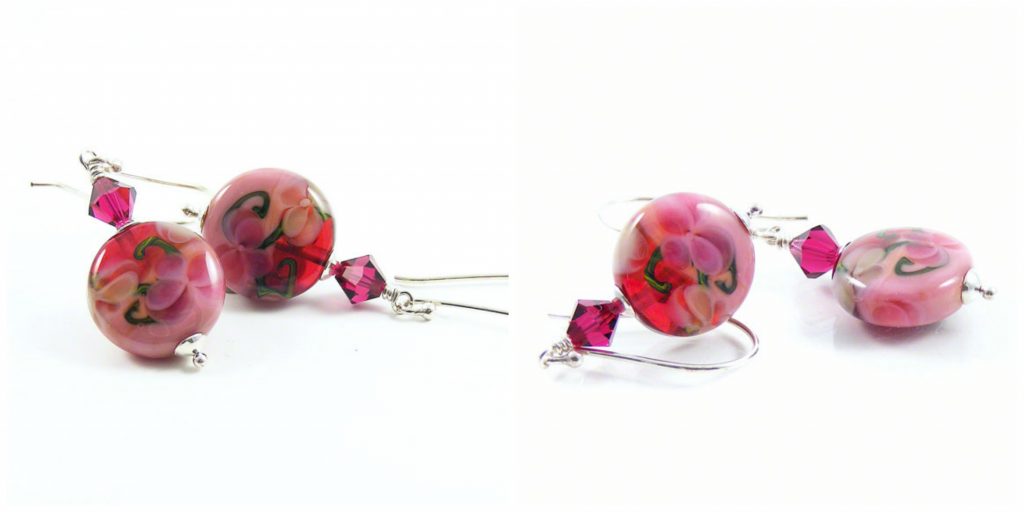
Erika Price used artisan lampwork glass and Swarovski crystals to create these beautiful Raspberry Ice Cream Earrings. Yummy!
To make your own earrings, check out these helpful tutorials on Wiki How where you can learn how to make simple beaded earrings, hoop earrings and stud earrings. Plus you’ll see some examples of how to incorporate unique and found items into your earring designs. These two beginner’s guides here and here will also get you started with ease. And these 42 fab DIY earring ideas are easy enough for even teens to make.
Making Bracelets
Bracelets: Those must-have adornments for the wrists. But with so many styles and ways to construct a bracelet, where do you start?
In addition to these 12 expert tips for making beautiful bracelets, here are some basics to consider:
Material & Style: From a hard bangle or wooden bracelet to a soft leather cuff, there are many options when making bracelets. Do you want to use a soft material that you can cut up, or do you want to manipulate a solid piece of metal? Do you want to join beads or chains to create the final piece from many small parts? Perhaps you want to laser cut an acrylic bracelet?
Size: Sizing is also consideration. Too small and it’s either uncomfortable or can’t be worn. Too big and it falls off. To make sizing a bit easier, think adjustable. If making beaded bracelets, using elastic gives a universal fit. Sliding knots can also personalize the size. This guide can help you determine bracelet sizing for women, men and children.
Clasps: Unlike necklaces with clasps at the base of the neck, bracelet clasps are much more visible. So choosing a clasp that is both functional and aesthetically appropriate for your design is important.
If beading, you could simply make a loop to pop around a corresponding part. If using leather, incorporate a snap. When working with chains, you could use a fastener attached with a split ring. Surprisingly, there are more clasps available than you think. Check out this resource that demonstrates 23 different kinds of jewelry clasps.
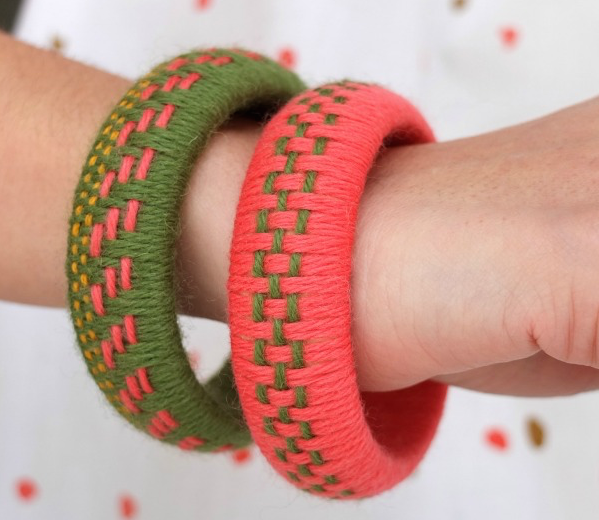
Here’s an unexpected DIY bracelet idea: The woven bracelet. Use a wooden bangle blank (or even an old bangle that needs restyling) and some yarn to make this fun accessory. To tap into the current woven trend, get the tutorial over at My Poppet.
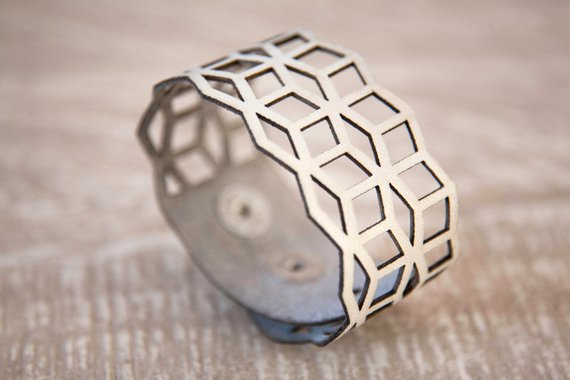
Inspired by modern patterns and unique designs, Etsy seller RockBodyLeather uses an artistic arrangement of laser cut geometric cubes to create this leather cuff bracelet with a metal snap-button closure.
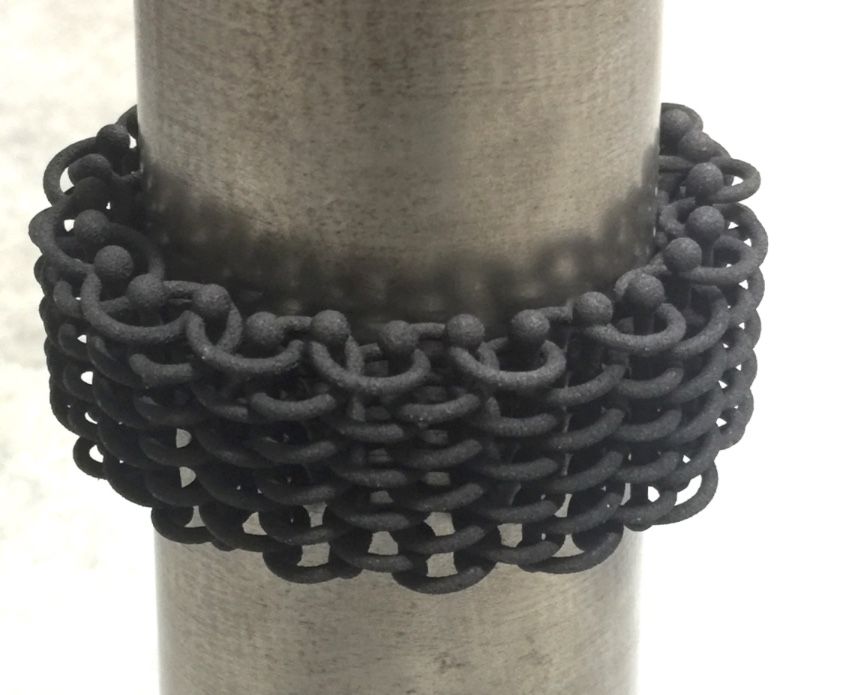
This chainmail patterned bracelet was 3D printed to give the impression of an intricately constructed metal piece—without all the difficulty and time-consuming work of metalsmithing.
Need even more inspiration to make your own bracelet? Check out how Freedom Creative used kimono fabric insets in a collection of bamboo jewelry. To get started making a beaded stretch bracelet, this step-by-step tutorial will show you how.
For 27 bracelet ideas that are perfect for sharing with friends (or selling on Etsy!), check out this post. And don’t miss these 40 DIY bracelet tutorials here.
Making A Ring
Put a ring on it by making a ring yourself. Because rings are so small, usually they are made from one or two materials. This is a benefit because the simplicity allows you to focus on creating a nice finish—and making a fashion statement, like these wooden rings via TopInspired.

When getting started, consider these things:
Materials: When designing your own ring, you have to make two major choices: Band material and focal point. You can purchase pre-made metal blanks, metalsmith your own, wrap a substantial wire such as copper, use chain or even incorporate beaded elastic cord. You could even braid leather or crochet yarn for that boho feel.
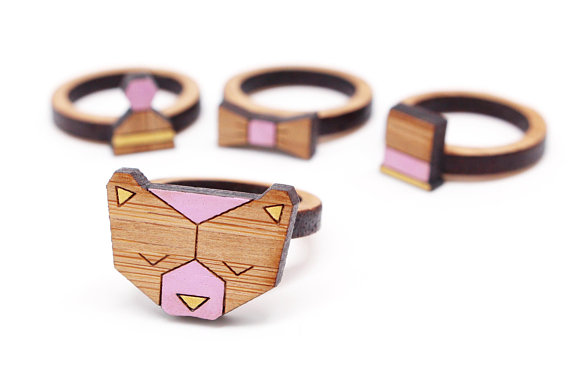
For the focal point, just about anything goes. Adhere stone, crystals or gems to a base. Wire-wrap rocks. Paint river rocks. Mold clay. You could make one from an old coin. You might even like to make an acrylic ring or a wooden ring like this groovy grizzly out of laser cut bamboo.
Whatever materials you choose, just make sure they are durable. Hands are constantly being used and bumped, so your rings must stand up to the abuses of daily life.
Size: When talking ring size, it must be pretty specific so the ring doesn’t tumble down the sink when washing your hands. (Been there, done that.) If you’re just making for yourself, you can measure using a piece of string. But if you’re selling your rings, you’ll want to invest in a ring mandrel to accurately size your designs. This size chart gives measurements for not only the inside diameter but also the inside circumference.
A correctly sized ring won’t pinch or pull, nor will it be so large that it easily slips off. But it will have enough tension on the finger to fit comfortably below the knuckle.
Traditional jewelers use wax for lost cast molding, and you can make casts and molds yourself. But these days, there’s an easier solution that employs just a little tech. By using computerized modeling programs, you can create designs to laser cut or 3D print jewellery such as these contemporary jewelry pieces.
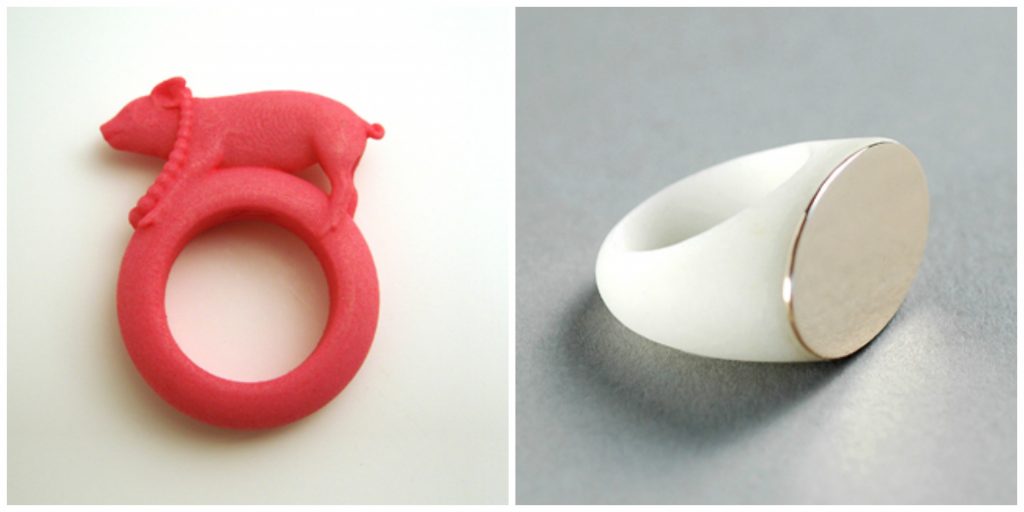
In addition to the nylon with glass fibre construction on the left, the Missy Piggy rings designed by Ted Noten have also been produced in titanium as well as gold.
The Fisherman’s Ring on the right is 3D printed using the most unusual of materials. Designed by Stefan Heuser, the white part of the ring is made from breast milk that was turned into a powder and then combined with a special glue. The oval is gold. Just goes to show that there really are no limits when it comes to jewelry materials.
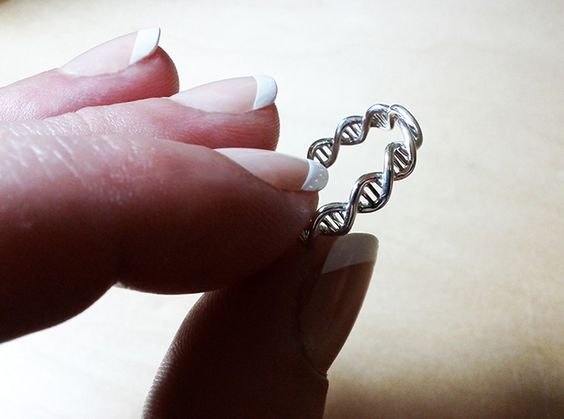
When it comes to constructing intricate patterns, such as this Ring Of Life DNA Molecule Ring, nothing beats the 3D printer for ease of making.
To get started making a ring of your own, check out this tutorial that uses braided wire and no tools! And you’ll be blown away with these 40 ways to add some zing to your DIY rings.
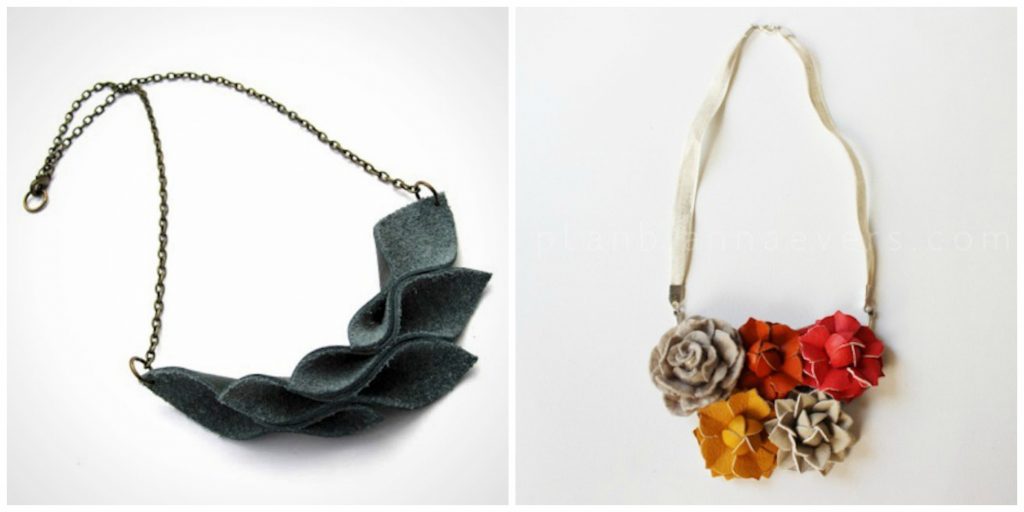
Making A Necklace
When you decide to design a necklace, it can be to add a stunning piece to your Etsy store collection, or it could serve a more functional purpose such making a medical alert necklace. Whatever the intent, the options for creating handmade necklaces are pretty much endless—and oh so fun.
Some considerations when making necklaces:
Size: Necklace length often determines the proportion of the materials used to create it. The shorter the necklace is, typically the smaller and more delicate the pieces/parts. Longer necklaces can handle more visual and physical weight.
Necklaces typically fall into six basic lengths (give or take):
Collar: 14” / 36.5 cm
Choker: 16” / 40.6 cm
Princess: 18” / 45.7 cm
Matinee: 20-24” / 50.8-61 cm
Opera: 30” / 76.2 cm
Rope: 33” / 83.8 cm
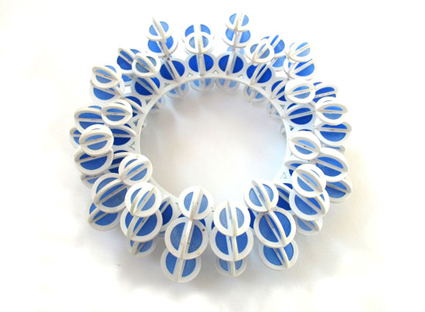
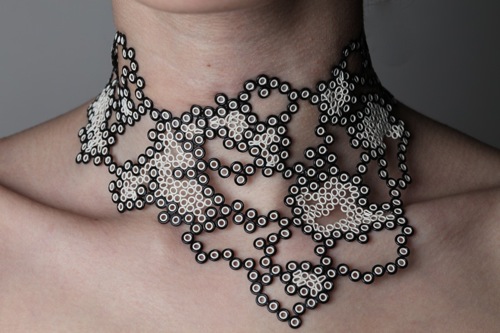
Materials: Necklaces can be as simple as putting a pretty pendant on a chain or as elaborate as incorporating multiple materials such as beads, wire-wrapped stones, laser cut plastic or wood, or even 3D printed pieces. When using smaller parts, creating repetition or a pattern can be visually effective. And if you want to really go big, do it! Statement necklaces give creativity a place to shine.
Talk about making a statement. Bet you’ve never seen a necklace that incorporates patterns found in cell growth, fractals and nature. Using nontraditional materials such as plastic, vinyl and rubber in her work, Melanie Greenberg of Greenberg Jewelry is pushing the definition of what jewelry is.
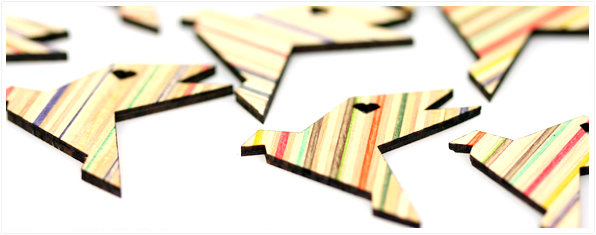
If leaving a smaller footprint is your game, then think about ways to incorporate recycled materials into your designs. This skateboard jewelry is, you guessed it, made out of old skateboards.
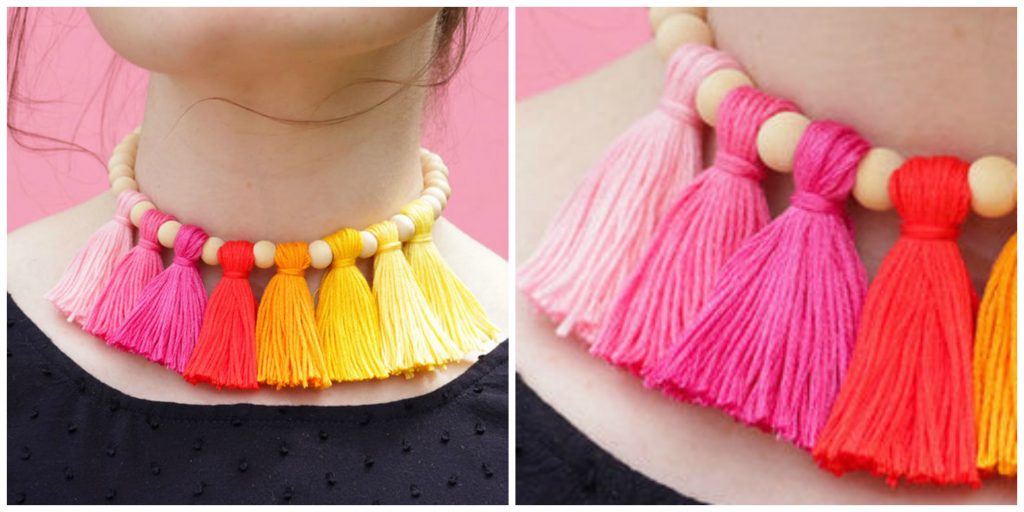
You can even turn simple supplies such as wood beads and embroidery thread into an on-trend tassel necklace. Get the tutorial here.
For even more inspiration, check out the beautiful color combinations and interesting material combinations on pieces from The Cerebral. Dive into laser cutting with these 40 A to Z jewelry designers. And you’ll want to bookmark these 40 gorgeous DIY necklace ideas where you’ll find pieces made out of everything from leather scraps and clay beads to fabric-covered popsicle sticks and kitchen tiles.
Jewelry Making Tutorials And Resources
When it comes to learning, nothing works quite like watching someone else perform a task and imitating their actions. That’s the magic of tutorials.
Kind of like cooking (anyone notice a theme with our examples?), getting some basic recipes down means you have a foundation you can build upon to create new and exciting meals. Same with making jewelry. Maybe not as delicious, but certainly just as fun and definitely more long-lasting.
Throughout this guide, we’ve linked to several tutorials at Craftsy, Interweave and The Spruce. While there are too many great sources to list, these sites are great places to start and each has waaaaaaay more info on how to make custom jewelry than we can possibly list or link to in one article. So make sure to take some time browsing all the available info and check out more tips here to get started with beginner jewelry making.
Along with learning how to get your jewelry design production ready at the Maker’s Row website, YouTube is also an excellent source for seeing a demo of just about any jewelry making technique. Whether you want to learn the basics of how to properly crimp (and get a product review to boot!) or get a glimpse into the future of jewelry making with 3D printing—or anything in between—there’s bound to be a video of it. Who knows, you could end up like designer Karen Kavett, who was able to actually grow her customer base while providing helpful jewelry making videos.
You can also find some great tutorials and visual inspiration on Pinterest. And for those who want to take a bit more time studying how-tos, there are some very educational text- and image-based PDFs available, such as these tutorials from Eni Oken. There you’ll find 18 lessons on fun topics such as wire weaving and beaded flowers, and she has even more available in her Etsy shop.
For tips on how to source jewelry making supplies online, especially beads, check out this resource from Interweave.
If you’re interested in laser cutting jewelry, you’ll need to create a digital vector design file via software such as Adobe Illustrator or Inkscape. If you are lucky enough to have access to a laser you can then run the design on laser yourself (fun), or if you don’t have the access/time you can send it to a service such as Ponoko to make it (easy peasy). Check out Ponoko’s design guides here.
While all of the above tutorials are focused around what it takes to actually make jewelry, there’s another very important kind of tutorial if you’re going to be selling your jewelry: Photography. Capturing the beauty of your creations photographically is absolutely essential if you want to make sales.
In fact, the Etsy sellers interviewed in this marketing tips tutorial say that your photos should be “drool-worthy.” But don’t think you have to drop major dollars on photography equipment to get those yummy shots. Point-and-shoot cameras and smartphotos can work great—if you know how to use all the features.
To get started, check out this article on how to take photos of jewelry. When it comes to getting the right lighting for your jewelry, this $6 hack may be just what you need. And you’ll want to bookmark this step-by-step tutorial on how to use your smartphone to capture high-quality product images.
Jewelry Making Blogs
Want to see what’s on trend and keep up with the latest jewelry news? There are some excellent jewelry blogs that offer relatable commentary, helpful tips and step-by-step instructions to help you be successful on your jewelry-making journey.
Check out Feedspot’s list of Top 50 Jewelry Design Blogs for Jewellery Designers, where you’ll find a continually updated collection of jewelry bloggers that write about jewelry trends, interview fellow artisans, and offer tutorials and classes to help grow your jewelry-making skills.
Often, these jewelry making blogs will have additional insights on jewelry making supplies, reviews of products and tips on the business side of selling jewelry. You’ll also find some specialty blogs that cover antique and period jewelry, celebrity jewelry, gemstone education and much more.
And who knows, once you get into making jewelry you just might want to share what you’ve learned and become a blogger yourself!
Making Jewelry To Sell
Wearing jewelry is a personal experience. It complements clothing choices while highlighting your unique personality. Jewelry makes a statement. Because jewelry is so individual, some things that you really like might not be everyone’s cup of tea. And that’s ok if you’re simply making for yourself.
But if you want to expand making jewelry at home into a small business, then you need to research what the market is doing and where your particular style and interest fit in. You must understand what trends are hot and how your unique flair can be added to create jewelry designs like no other.
A successful jewelry business usually has a clear style that runs through all its pieces. Are your designs traditional and timeless, or do they fluctuate with what’s on the runway? Do you create simple pieces or more ornate works of art? Is your style contemporary, vintage, whimsical, ethnic, edgy, art deco, earthy?
What about color? How do you incorporate it into the actual designs and/or how you style your products in photos? In addition to watching what fashion designers debut in their spring and fall collections, you can also get a sense of color trends from Pantone. Each year, this color authority deems a “color of the year” that you’ll see in everything from retail fashions to home goods. For 2017, it’s “greenery,” while “ultra violet” is 2018’s color.
What kind of person is your target audience? Identify demographics (the “who” your buyer is such as gender, age, ethnicity, income, etc.) as well as psychographics (the “why” your buyer needs your product such as values, hobbies, spending habits, etc.).
With all that in mind, what is it like to own a jewelry business? Check out this interview with designer Janice Law for some small business insider tips so you can grow from her experience when learning how to make jewelry to sell.
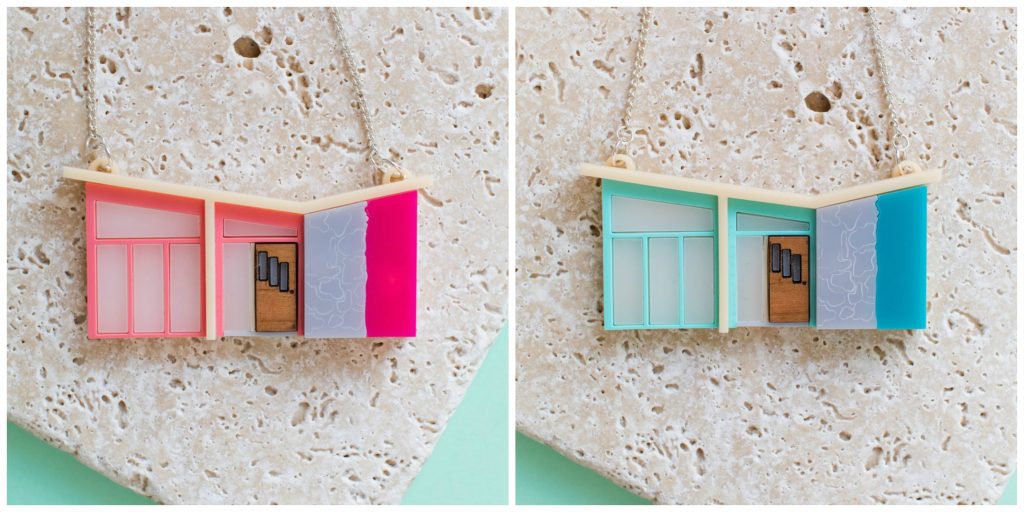
For inspiration, check out these laser cut jewelry ideas from 100 designers such as the Palm Springs Mid Century House Necklace from Finest Imaginary. The intricate laser-cut details and nostalgic aesthetic offer some insight into what buyers want in custom jewelry design today.
Pricing Jewelry To Sell
When making jewelry to sell, pricing is pivotal. Do you want to have a high price point and only sell a few pieces, or are you interested in selling heaps of product on the cheap? Whichever you choose will start shaping the brand you want to create.
Many things go into setting your price. Some considerations:
- Raw materials costs + any associated shipping/delivery costs
- Selling fees (online transaction costs; booth space costs for markets/fairs; boutique commissions)
- Shipping and packaging costs
- Display materials
- Photography equipment
- Marketing and branding costs (website hosting and development, advertising, business cards and any other collateral, etc.)
- Your time
- Market price (what similar items are selling for)
To sell homemade jewelry successfully and profitably, basic business principles apply. And while price is always part of the mix, it doesn’t necessarily drive the sale of handmade jewelry.
The main focus and the reason DIY jewelry artisans exist is to bring their individual, unique designs to the market. Buyers understand this. So while they’ll pay more for handcrafted pieces as compared to purchasing mass-produced jewelry from China at the mall, you still have to be competitive.
For some initial insight into growing your jewelry business, check out these five tips from Interweave + these five tips from Craftsy. You can also find a wealth of selling tips and additional resources here.
And for an insider’s look at how Etsy seller Cottage On The Cliff determines how to make jewelry to sell as well as create a memorable brand around her products, check out the interview with designer/maker Liz Ulbin here.
How To Sell Jewelry Online Successfully
Determining how to sell handmade jewelry is a big decision. In the past, craft fairs and boutiques were the way to go. And they still can be. But today, most are selling jewelry online.
Why? Ninety-six percent of Americans shop online, according to this research. They spend an average of $488 per year—and 43% is spent on clothing, shoes and accessories (including jewelry!).
Selling online will give you the largest audience, but how do you reach them? You could set up your own website, but having shopping capabilities with secure checkout can be complex and expensive. Plus, most jewelry designers don’t want to be spending time on web development. They want to be making jewelry!
That’s where online selling services come in.
When figuring out where to sell handmade items, you have options. There are numerous websites to sell arts and crafts, such as giants eBay and Amazon. While they may be the most well-known, there are definitely more places to sell that aren’t so ginormous.
That said, when it comes to selling handmade items, Etsy is the place.
What is Etsy? It’s an online community where crafters, artists and makers can sell their handmade products and vintage goods. With 29.7 million active buyers and $2.84 billion in annual gross merchandise sales in 2016, Etsy has the search traffic every seller wants.
You can get a good feel for what Etsy is all about here. To take a closer look at how to sell on Etsy, check out this guide and read Etsy’s seller handbook.
To see what kind of jewelry is most successful (plus check out the competition!), check out the 2017 top Etsy jewelry sellers here. And for an amazing Etsy success story, check out this profile of LeiLei Secor, who by age 19 had made $100,000 selling jewelry on Etsy. Wow!
Using Social Media To Boost Online Jewelry Sales
Selling online and social media go hand-in-hand. The Challenge: There’s a lot of noise on social media, so getting noticed isn’t easy. But using the right hashtags can help.
Explore hashtags that are not only broad-based for jewelry but also specific to the kind of jewelry you’re selling. Some ideas to get you started:
Broad-Based Jewelry Hashtags: #jewelry, #instajewelry, #handmadejewelry, #jewelrygram, #jewelryforsale, #jewelryoftheday, #lovejewelry
Type Of Jewelry Hashtags: #earrings, #earringsoftheday, #earringswag; #necklace, #necklaces, #statementnecklace, #instanecklace, #necklaceoftheday, #pendant; #bracelet, #bracelets, #instabracelet, #wristparty; #rings, #ringselfie
Specific Jewelry Attribute Hashtags:
Base Materials: #sterlingsilver, #copper, #brass, #gold, #leather, #acrylic, #wood, etc. (can add “jewelry” to any of these)
Construction: #beadedjewelry, #beadedearrings, #beadedbracelets; #wirewrappedjewelry; #lasercutjewelry, etc.
Types Of Beads/Stones: #turquoisejewelry, #pearls, #swarovski, #rhodonite, #lavabeads, etc.
Etsy Hashtags: #etsyshop, #etsyseller, #etsyfinds, #etsyjewelry, #etsyhandmade
Click here for even more #jewelry hashtags.
Wear It Well
One of the best things about making personalized jewelry is that you can make it your own. What signature mark can you put on it? Do you love gold or glitter? Pop some on. Can’t get enough turquoise? Dangle it from ears, attach it to a pendant and wire-wrap it for a ring. There are no rules when it comes to making your own jewelry—except have fun!