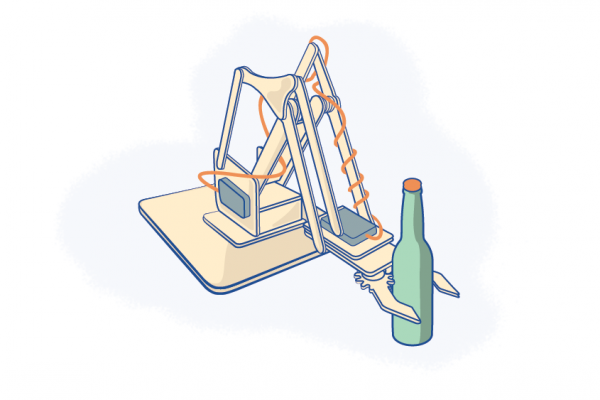
Understand The Basic Rules Of Laser Cutting To Reduce Your Making Costs
Are you paying too much for laser cutting and laser engraving? For the majority of makers, the answer is usually “yes.” So why do so many overpay for their designs?
It comes down to understanding the basic rules of laser cutting and then applying sound design principles to those rules so you, the maker, come out ahead.
Three Main Laser Cutting Costs
When making with Ponoko, there are three main laser cutting costs to consider: Making, Materials and Shipping.
Making Costs are all about labor—mostly machine labor and a little bit of human effort. Think of your design file as a work order, a set of instructions for the machine to follow. The simpler and more efficient your instructions are, the less time it takes the machine to follow them. When laser cutting, time equals money. Lower the making time, and you’ll achieve lower laser cutting prices.
Materials Costs can vary greatly, and your material choice impacts making time. The general rule is that thinner and lighter materials cut faster. Thus, the quicker your design cuts, the less it will cost.
Shipping Costs can have quite an impact on smaller projects, so combining several products onto a larger sheet size can reduce the per-unit price. For larger or more complex designs, it’s often worthwhile to take advantage of Ponoko’s $100 free shipping threshold.
Top 10 Ways To Reduce Laser Cutting Costs
Keeping those three main laser cutting costs in mind, we’ve determined 10 basic ways you can reduce laser cutting costs to walk you through the process and give you the foundation necessary to make your designs as efficiently—and cost effectively—as possible.
To demonstrate how to implement each cost savings tip and see what kind of cost savings can be actually be achieved, we’ve included an example product, a necklace pendant engraved with a fuchsia flower.
Are you ready to save some cold hard cash by reducing your laser cutting costs? Let’s get started with the first tip:
Tip 1. Make A Digital Prototype
Before spending any money, you can actually save a surprising amount just by formatting your design files so that everything works in your favor.
Using digital (or zero cost) prototyping, you can upload design files and choose materials. This prices different design iterations instantly and reveals where the project can be optimized to save money on laser cutting, shipping and more. The best part is that you get all this valuable information without spending a single cent.
Let’s try it.
Using this fuchsia flower design inspired from an image on Pixabay, we created a 40mm tall x 21mm wide pendant for a necklace. (Want to make it? Here’s the design file in the Ponoko Showroom.)
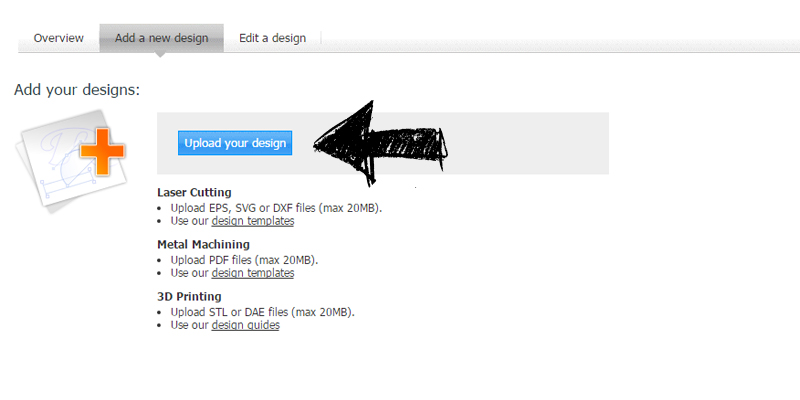
To get started, prepare your digital prototype using our design guides. Then upload the design.
As you’re tweaking your design, keep these laser cutting costs in mind:
- Cutting longer lines takes longer than cutting shorter lines.
- Cutting lots of short lines takes longer than cutting a less detailed design.
- Cutting circles takes longer than cutting straight lines.
- Engraving lots of lines takes longer than engraving a few lines.
- Engraving solid fill areas just takes a long time.
- Every design feature results in more cost, so start simple.
- Every inch is highly valuable area, so use every inch.
After uploading the file, it’s time to select materials. Let the fun begin!
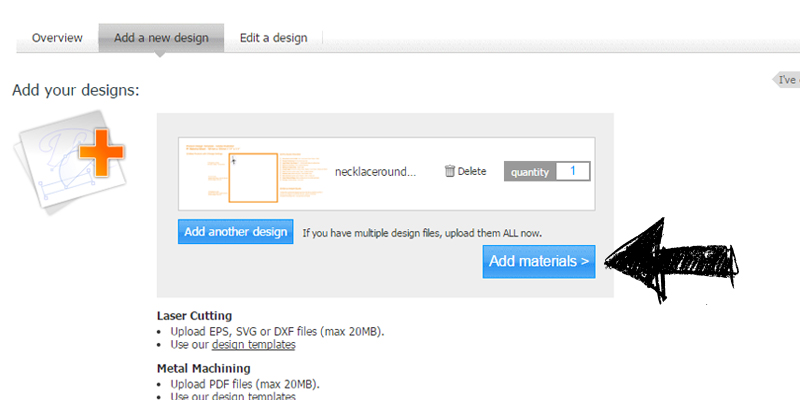
Throughout each of the tips, we’re going to use one of our favorite two-color acrylics—brushed gold on black—because of its beautiful contrast.
To get an instant quote on your digital prototype, follow these steps. For our example necklace pendant, the making cost is $1.10 + the sheet cost of $12 for a total of $13.10.
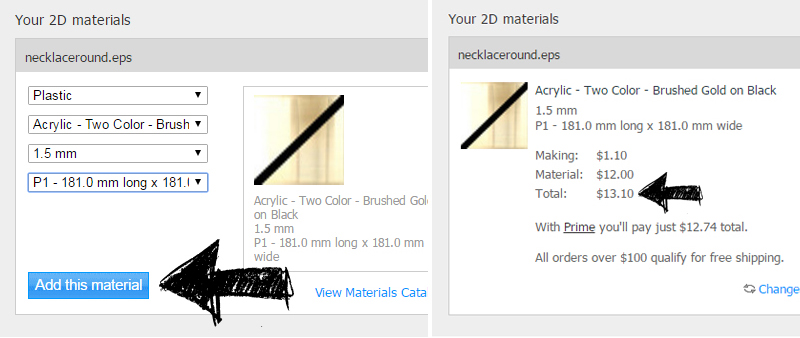
If this price works for you, then you’re one step closer to making. But if you want to shop around a little, go back to the materials selection and try other options.
But before you commit to making this design, stop. Instead, move on to the next tip.
Tip 2. Print A Paper Prototype
Have you ever noticed that it is easier to find mistakes when something is printed out rather than on your computer screen? Think back to that term paper in school or a report you prepared for your boss. You always printed a copy to check for typos and formatting errors before handing it in.
Laser cutting is no different. Even if you’re positive that the product design is just right, it is always wise to check those details one more time before sending files to be laser cut. (Just ask Josh Judkins how his first laser cut business cards turned out when he didn’t print a paper prototype.)
Working with digital files can be super efficient, but sometimes people do lose track of whether their design will look just as good in the physical world as it does on screen. Let your trusty desktop paper printer be your free prototyping BFF. It’s so simple!
Start your physical prototyping at home. Printing out your design on paper is an ideal way to spot sizing or design errors, see whether holes or tolerances are big enough, and get a general feel for what your final result will look like. It’s free, instant prototyping at its best.
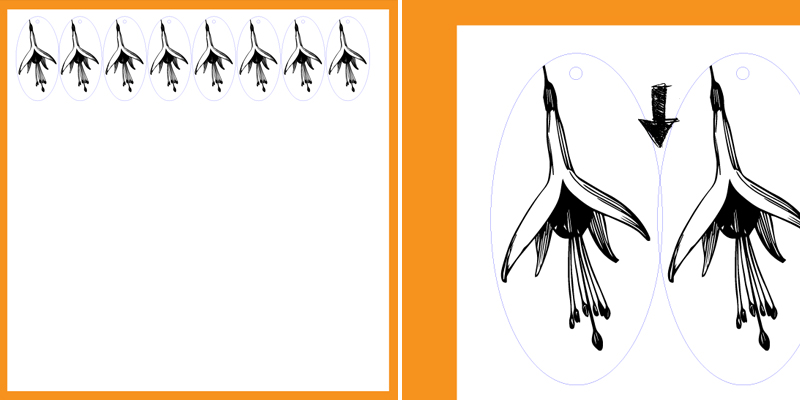
Let’s check in with our laser cut jewelry example. By printing a paper prototype, you can see the hole to attach the pendant to the necklace is waaaay to close to the edge. Move it down to avoid thin parts.
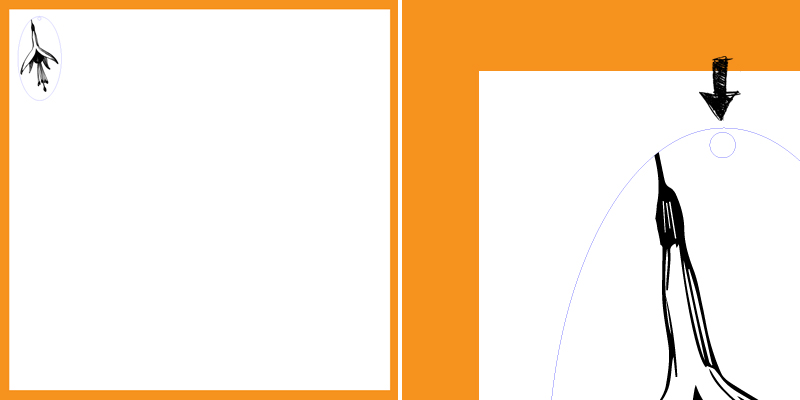
Overlapping parts is another common problem. By printing out the file, we can see there is some overlap on the edges—definitely not the desired result. Space these beauties out so that the oval cuts completely.
Once you have confirmed all the details are correct using the paper prototype, it’s time to move on to the next tip.
Tip 3. Make A Cardboard Prototype First
It’s exciting when your design is ready to be laser cut, but it really pays off to do a trial cut in cardboard first before moving ahead with more expensive materials. This step is an extension of the paper prototype, but this time the lasers are firing.
Cardboard has an inexpensive base price + it cuts really quickly. With laser cutting, you are paying for the time it takes for the machine to cut your design, so choosing a material like cardboard nets a fast, inexpensive test run of your design. It’s the best way to get some cheap laser cutting before committing to your final design.
This cardboard prototype is all about function. Does the design work? Is the engraving too thin? Do interlocking parts perform as expected?
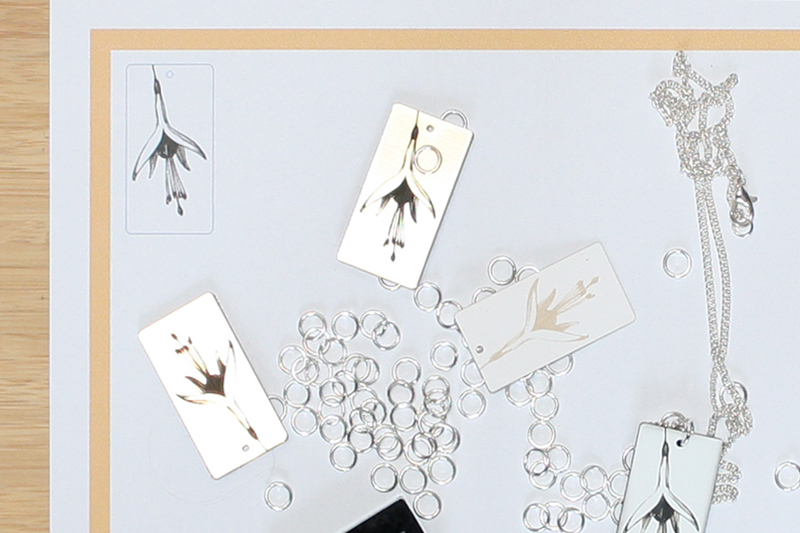
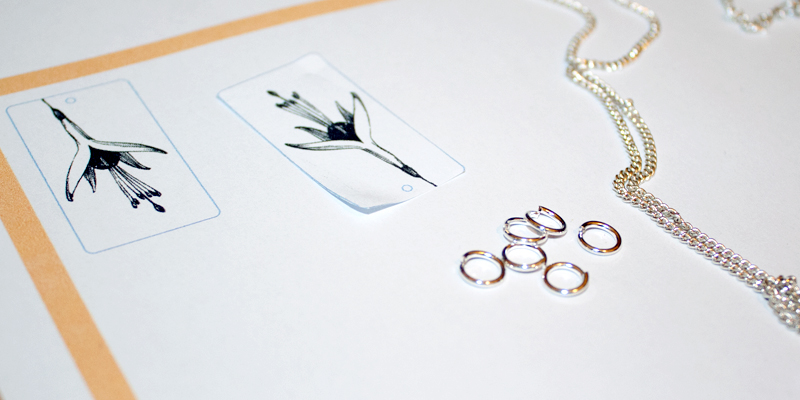
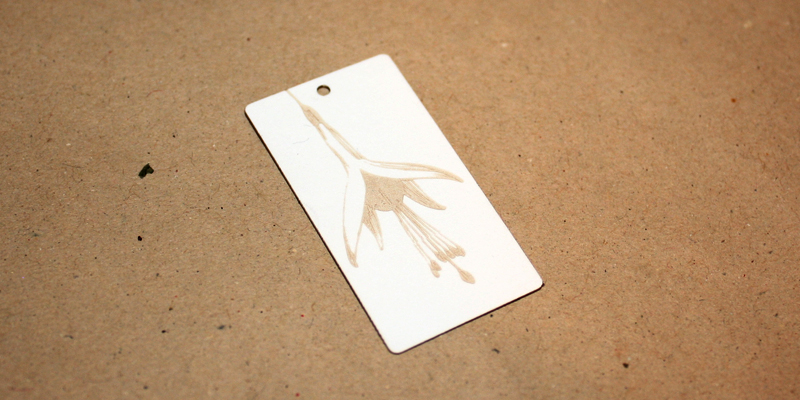
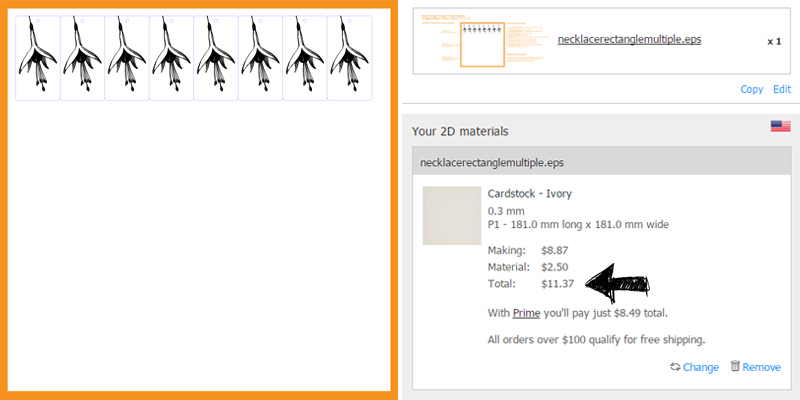
For our laser cut jewelry example, we chose to use ivory cardstock—also an inexpensive, paper-based material—to prototype the design of the necklace pendant. This material allowed us to check the laser engraving details of the flower with a pretty golden contrast. We think it looks beautiful. Do you?
If your cardboard prototype isn’t quite what you hoped, not to worry. Go back to the drawing board and work out the details.
Once you’re happy with the cardboard prototype, you can order the design in a more expensive material with greater confidence that it will come out the way you expect.
If your final outcome is to be made from cardboard…well, then kick back and relax because you’re already one step ahead!
But before you dive in with a huge order, this next tip has a handy bit of advice that is easy to overlook.
Tip 4. Test Prototypes By Starting Small
Whether you’re an experienced maker or new to the laser cutting scene, it’s always best to keep things small and simple at the beginning. Because each material reacts differently to the heat of the laser, it’s best to test prototypes.
For example, cardboard has a small kerf (the amount of material burned away when cut). Line and area engraving both have nice contrast because of how the laser actually burns the cardboard to a warm brown color where engraved. But beware: Too much detail will catch fire!
Brushed gold on black acrylic (the choice for our jewelry example), while it won’t catch fire like cardboard, it does have a low melting point so too much detail will cause it to deform. Because it is thicker and harder (thus more energy has to be applied to cut through it), two-color acrylic has a larger kerf than cardboard. And in terms of engraving, line engraving is not as obvious while area engraving has much better contrast.
(For more on each material, check out the materials catalog where you’ll find details about the material’s performance as well as images of how line, area and combined engraving look on your material of choice.)
So as you can see, it is important to test prototypes employing the exact material you want to use. Do a couple of small tests and iterations before making a large order. It’s always risky to make a large order of an untested product because if the items are unusable, you’ve wasted time and money.
So start small with the Ponoko P1 template. The smaller dimensions of the P1 not only keep material costs lower (small material sheets are less expensive than larger sheets) but also constrain the amount of making time (remember: time = money). Also, smaller sheets cost less to ship because they weigh less than larger sheets. All of these factors are important either when experimenting with laser cutting for the first time or if you are trying out a new material that you haven’t used before.
Make the most of the P1 template size by performing small tests of multiple design ideas. Don’t assume your first attempt will be “The One.” Try multiple cuts, shapes, engravings, etc. to see what looks best.
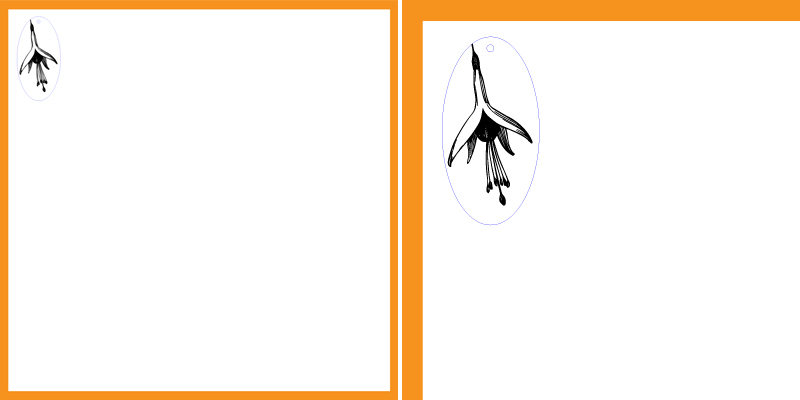
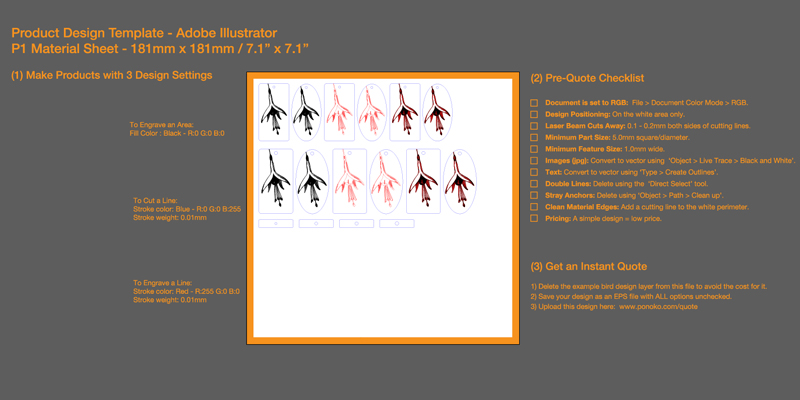
For our laser cut jewelry example, we’re testing a number of designs for our necklace pendant. In this design file, we have two different overall sizes, an oval as well as rectangle shape, and four sizes of holes to see which works best with the necklace chain.
Keep in mind that with laser cutting, more size or complexity means greater costs. Starting small enables you to test your ideas and be confident before charging ahead with multiple items on larger sheet sizes.
Remember: It’s more likely you’ll end up with a design you are happy with if you understand that making isn’t about getting that perfect outcome on the first try. No one’s first design is ever perfect!
And if your design still needs work after you test prototypes, that’s ok. This next tip can help.
Tip 5. Simplify Details
With laser cutting and laser engraving, time = money. When designing your product, you want details that make it special. But intricate designs increase laser cutting costs.
You’re paying for every movement the laser cutter makes. Many small detailed forms take longer to trace out than fewer larger forms. Circles take longer than straight lines. In order to be cost effective, simplify details.
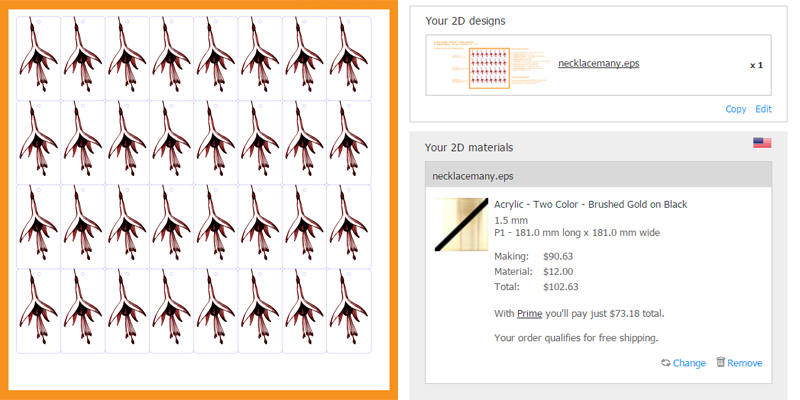
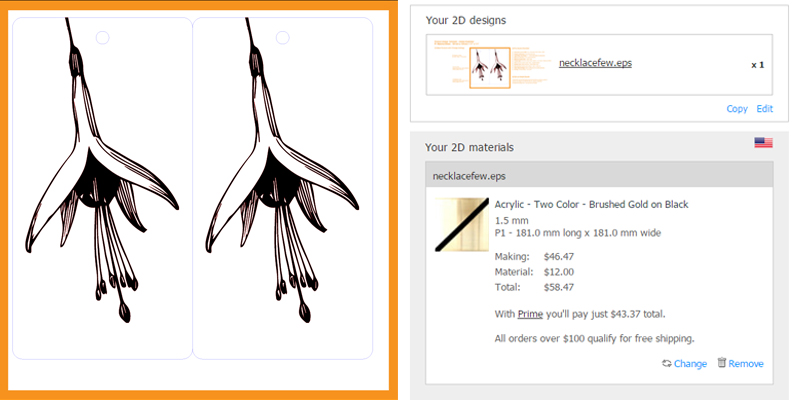
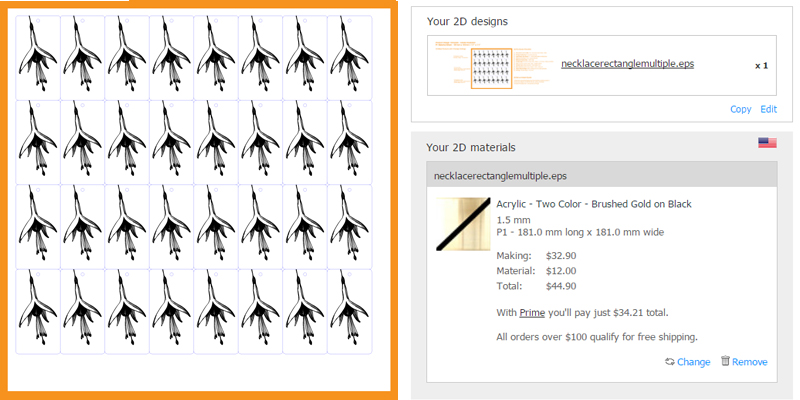
Let’s check this out with our jewelry example. We can get 32 necklace pendants on a sheet, which costs $90.63 for making + $12 for materials for a total of $102.63.
But what if we decided to create a larger version of this necklace and use it as a piece of wall art instead? We could get two of the large designs on a sheet, which drops the making costs down to $46.47. While the material cost is constant at $12, the total cost is reduced to $58.47—a savings of $44.16.
This example proves that many small detailed forms are going to cost more than fewer larger forms. But do you want to sell necklaces or wall art? Only you can decide.
What about circles vs. straight lines. In quoting our necklace pendant with the oval shape, the making cost is $1.10.

Contrast that with the rectangle necklace pendant, which is $1.07.
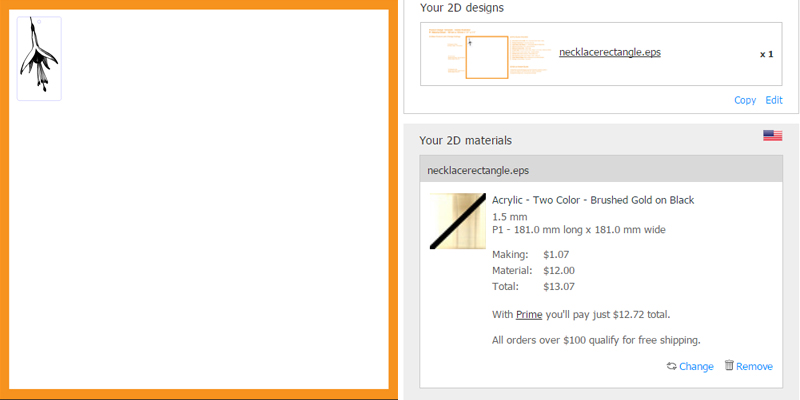
A three-cent savings isn’t much between the two, but it does illustrate the point. If we extrapolate that out for an entire sheet of 32 pendants, then that’s a $0.96 difference per sheet. Also not a budget-buster.
But if you sell lots of these necklaces and order 25 sheets at a time, then you’re getting close to $25 per order. Place four of those orders, and you just spent an extra hundred bucks that could have been in your pocket had you changed the design from oval to square.
It’s a delicate balance with details and laser cutting costs. But look closely at your design: Are there any details that don’t impact the functionality or overall aesthetic that could be removed to save cutting time—and money?
Speaking of cutting time, this next tip focuses on another way to save time, and therefore cost, with your laser cutting.
Tip 6. Avoid Double Laser Cutting Lines
When objects are positioned side-by-side in your design file, double laser cutting lines can result if there is an overlap. Thus, the laser will cut the same section twice—which is not the best for your material or for the machine—or for your budget! Don’t pay double. Examine design files to ensure there are no shared lines or overlaps. Only a single cutting line is required.
In both Illustrator and Inkscape, you will see these as being a darker blue to the other lines.
To correct double laser cutting lines in Illustrator, use the “Direct Selection” tool to click on each of these lines, and hit delete twice. This should leave another line behind, paler than the original one and the second delete action will remove any stray anchor points.
If you are using Inkscape, you can find instructions for removing double laser cutting lines here.
Remember that with laser cutting, you are paying for every move the laser makes. Don’t pay twice; check the design file before uploading.
What’s another way extra costs can hide in your design files? Keep reading.
Tip 7. Group Pieces Close Together
Do you like to put jigsaw puzzles together? We sure do. Have you ever thought about how much space the pieces take up individually when spread out on a table vs. when the final puzzle is complete?
Yep, it’s a big difference. Now think about how the pieces of your product are configured in the design file. If they’re all spread out, they take up more space. And the more space the laser has to travel between cuts, the more time it takes—and the higher the laser cutting costs.
Reduce extra travel time of the laser by grouping (a.k.a. nesting) objects together. This is especially important for area engraving, as the laser head passes across the sheet many times horizontally until the area has been completely filled (similar to how an inkjet printer works).
Depending on your design, it may even be possible for some pieces to share a cutting line. Just be sure you don’t forget about removing any double lines as we saw above if there are any overlaps.
When pieces are close together or sharing a cutting line, be sure that you leave enough space for the kerf—how much material the laser burns away. (Learn more about figuring out kerf for precision parts and check out this DIY kerf tool.)
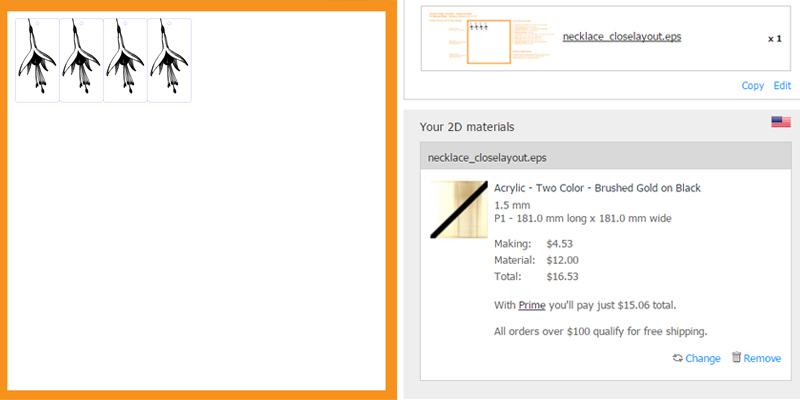
How does grouping our example necklace pendants together impact laser cutting costs? Let’s check it out.
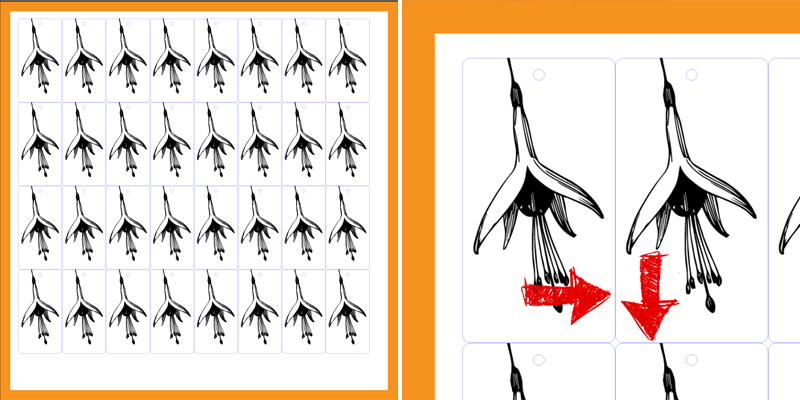
In this design file, we have four pendants spread out. This nets a $14.77 making cost.
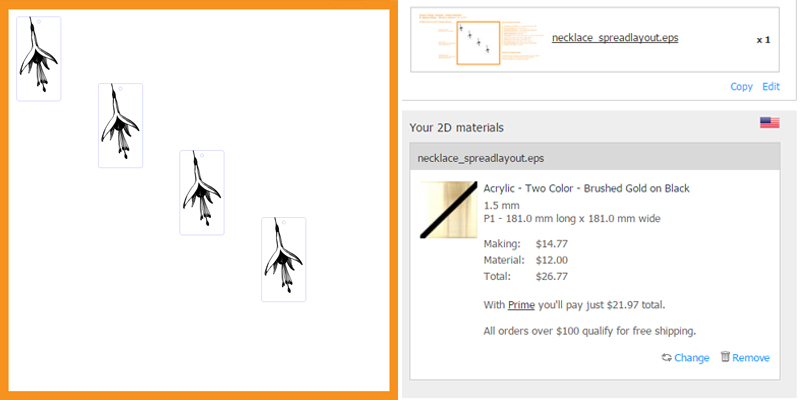
Contrast that with this design file, where the four pendants are adjacent. The making cost drops to $4.53. By nesting the objects, you just saved $10.24!
Remember that you pay for every minute the laser is cutting, engraving and travelling between cutting and engraving. This means you want a great design that takes as little laser time as possible.
Once you have tested (and tested and tested!) your design on the P1 template and are ready to produce multiple copies, clever use of the larger P3 template will further reduce the laser cutting costs per item.
Now that layouts are all sorted, let’s move on from outlines to engraving details.
Tip 8. Compare Line vs Area Engraving
When it comes to creating surface details on your design, both line engraving and area engraving have their merits. Line engraving involves the laser following a defined shape, whereas area engraving is similar to how an inkjet printer works, with the laser head passing across the sheet many times horizontally until the area has been completely filled.
But which is the best—and most economical—style for controlling laser engraving costs? It depends.
If your design is a big simple shape, then line engraving is typically less expensive. But if the design has a large detailed area or many small detailed pieces, then area engraving is often the most economical.
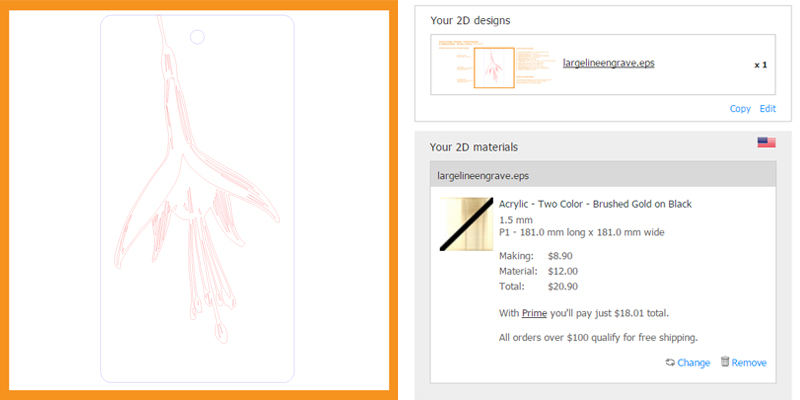
Let’s see how this works using our example. Going back to the large wall art version of this fuchsia flower, area engraving has a cost of $16.17.
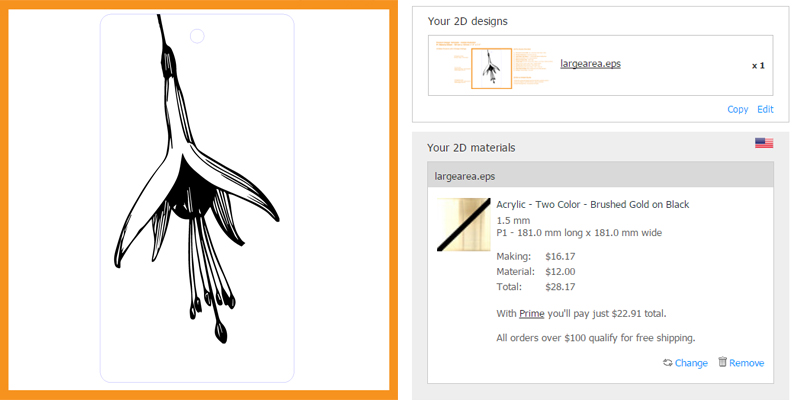
Contrast this with line engraving of the large shape, which has a cost of $8.90. That’s a savings of $7.27!
So with large shapes with simple design, line engraving is definitely the way to go to keep it budget friendly. But what about when we look at the pendant necklace size of our example?
For area engraving, the making cost is $32.90.
Whereas the line engraving cost is $62.60.

Whoa! Line engraving is $29.70 more than area engraving in this example. Lesson learned: Area engraving is definitely the most economical when there are many small detailed pieces.
For more insight on laser engraving costs, check out this tutorial on Tips & Tricks To Reduce Laser Engraving Costs.
But before you do, continue on to the next tip to learn why the size of the material really does matter in laser cutting.
Tip 9. Consider Material Thickness
Choosing the right material can reduce laser cutting costs considerably. To cut out a shape, the laser is actually burning through the material. Each materials burns at its own unique rate. Basically the softer and thinner the material, the faster it cuts. For example, 4mm cardboard cuts very quickly whereas 9mm acrylic cuts very slowly.
How flexible are you on material choice for your design? To see how material composition and thickness impacts laser cutting costs, let’s try making with our example necklace pendants.
We created our paper prototype designs out of ivory cardstock. It has a material cost of $2.50 + making cost of $8.87 for a total of $11.37. Pretty inexpensive, as expected.
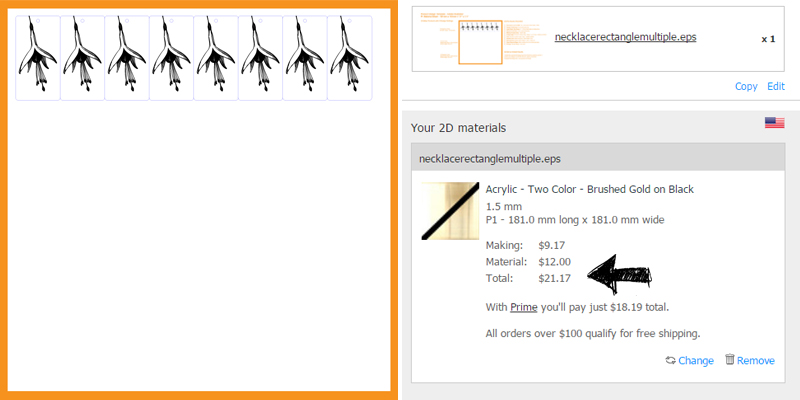
Next, let’s see the cost of the brushed gold on black acrylic. This material is $12 for the sheet + $9.17 for making = $21.17 total. It’s obvious that the price of the material would be more because a two-color acrylic is a higher quality than cardstock. But notice the making cost also increased by $0.30. Same design, but it takes the laser just a bit longer to get the job done.
Now what if we go with a super thick 9mm black acrylic? What would that do to costs? The material cost is $9. So while it is thicker than the brushed gold on black, the two-color acrylic commands a higher price point of $12. But the making cost jumps to $14.83. That’s an increase of $5.66. The thickness of the black acrylic takes much longer to cut than the two-color acrylic and significantly longer than the thin cardstock.
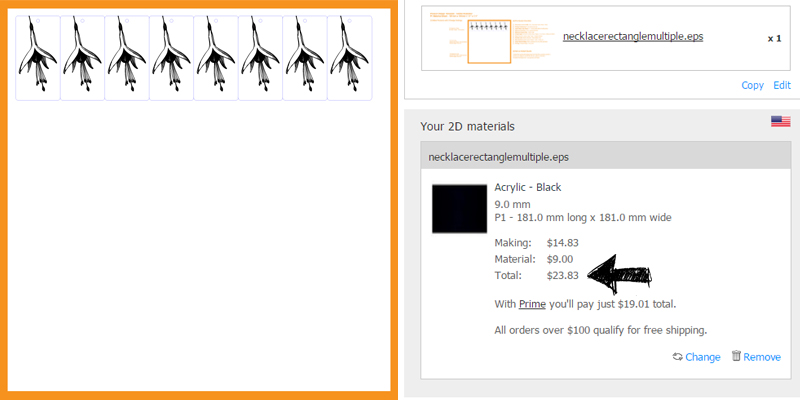
So there you have it. The total for ivory cardstock is $11.37 vs. $21.17 for brushed gold on black acrylic vs. $23.83 for 9mm black acrylic. Material thickness plays an important role in controlling laser cutting costs, so you must balance this with the other design considerations to achieve the overall lowest price.
But there’s one more cost savings tip for those more complex designs or projects that have a larger vision behind them.
Tip 10. Try Ponoko Prime
Laser cutting with Ponoko is a great way to have small items like electronics cases or jewelry cut and shipped to you for little more than the price of a hearty meal. But what happens if your appetite for laser cutting means designs that are bigger than bite-sized? Ponoko has a solution, and it’s called Ponoko Prime.
Existing as a monthly subscription, Ponoko Prime is just $39 a month (and you can cancel any time). Ponoko Prime members enjoy a range of benefits. You immediately save 32.5% off laser cutting costs, and as your order volume increases, so do your savings (up to 55% off). Higher volume orders = better making rates.
In addition to lower making costs and volume discounts, Ponoko Prime members get free shipping for orders more than $100 (in the continental U.S. from American hub; NZ and AUS from NZ hub). There are other perks to being a Prime subscriber, just check out the FAQs to see if you can save money by using Ponoko Prime. For a full breakdown of the volume discounts you’ll get with Prime, check out how you can get lower pricing for laser cutting.
How much can we save with our laser cut jewelry example by upgrading to Ponoko Prime? Check out this example:
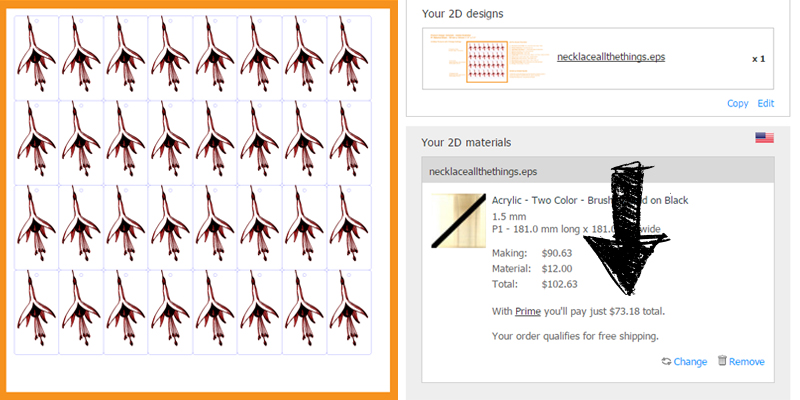
The standard pricing for a free account is $102.63. But with Ponoko Prime, the price drops to $73.18. That’s a savings of $29.45!
So evaluate your making requirements and consider upgrading to Ponoko Prime. There are some serious savings on laser cutting costs to be had!
We hope that these 10 tips to reduce laser cutting costs will help you optimize making, materials and shipping costs to give you the product you want at a price you love. Bookmark this post and use it as a checklist for your orders. When these considerations become a part of your workflow, they will make a big difference in reducing your laser cutting costs.
And if you get stuck on anything, send your questions to service (at) ponoko (dot) com. We look forward to seeing what you make next!
2 Comments
I do like that you recommend making a digital prototype first. After all, a digital prototype allows you to alter the design before physically cutting it. This can save you a lot of money on materials and energy costs.
Hi Callum, you’re so right! The old measure twice saying comes to mind here.
Comments are closed.