A guide to laser cut line optimisation
Discussions around the laser cutters at Ponoko continue to highlight how important effective nesting of parts in laser cut files is. Today we are taking a look at a real-world example of how optimising linework can achieve faster cuts and therefore save money. Cutting time is generally the most expensive component when ordering from Ponoko. In the Ponoko forums, people have shared their methods of saving money. Let’s take a look at nesting line work in greater detail…

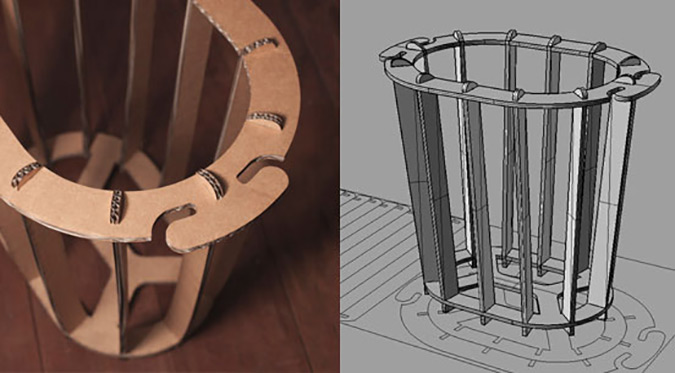
This is the design we will work with – a bin. It is designed to take standard supermarket shopping bags, and was cut from 6mm thick double sided P3 corrugated cardboard. The first prototype came out to be about $40, an amount that could be considered a little steep for cardboard. However, after a few design changes we were able to reduce the cutting time by nearly half.
Design
First, consider good design as being the minimum necessary. The phrase “more is less” is a good mantra to abide by. Clever designers will figure out the best way to maximise the use of materials and processes they undergo.
The ultimate guide to prototyping
Everything you need to know about prototyping your product ideas.
Look carefully at your design, is there anything that could be considered superfluous? Is there anything that if you took it away, nobody would miss it terribly?
Curved lines vs. Straight lines
Keep in mind that lasers slow down dramatically on curves. If you ask yourself ‘are there any parts that you can take away curved sections without compromising the overall design?’ and the answer is ‘Yes’, then be sure to head back to your design program of choice before sending files to the laser cutter. Several vector drawing programs allow you to simplify linework down to straight lines. If not, try to reduce the size of radiuses as shown in the image below.
Another handy tip is that if you have lots of long straight lines try to align them parallel with either the x or y axis – this means the laser’s lens is only traveling in one direction at a time, it is slightly more efficient for the laser cutting.
Check the laser won’t see double
There can be an issue with overlapping linework. The laser doesn’t know what your intention was – it just thinks you want to cut the same line twice. It may sound obvious, but some vector drawing apps are more prone to this than others, it is often very easy to duplicate or copy and paste linework on top of each other.
You usually can’t see this, but the laser definitely can. In extreme cases this will double your cutting time (and cost) and increases the chances of burning the material. Always check your drawing files for duplicate linework.
The Fix: ungroup lines and drag the vertex points around to check you have no double ups.
Nesting cutting paths
Are there any parallel lines, or semi-parallel lines you can join to one another to make one section? This will give you greater control over the order of laser cutting parts. Remember to delete any shared lines that may double up.
You can see in the bin example below we had 12 individual strips, but then we changed the design to make them parallel on both sides and placed them together. The laser splits them after it has cut around the outside with individual parallel lines.

Laser cutters don’t necessarily cut sequentially where you logically think they should. Sometimes they will travel to the other side of the material for the next line despite other linework in closer proximity.
Also, due to the slight unpredictability of the cutting order it can be helpful to upload several slightly differently nested files. Sometimes the placement of parts next to one another might help you save a few precious dollars or cents.
Experiment

Different materials have different cutting speeds and characteristics. Feel free to post any tips you find on reducing cutting time on the support forums and in the comments below. There is much to learn from hearing other people’s experiences.

Remember that it is unlikely your first design is going to be the best; prototyping is always an iterative process. Plan to make several variations of your design and do small tests so you don’t waste time, money and materials. As the results show here, a little tweaking of the design can save you a lot.
The content of this post by David McGahan originally appeared on the Ponoko Forums.