The Production Method Used For Mass Manufactured Plastic Parts
This post was written by John Teel and reposted with permission from the Predictable Designs blog
When creating a new product, injection molding is likely going be a big part of your journey to market. Regardless of your technical background you at least need to understand injection molding at a basic level.
Many entrepreneurs are surprised to learn that while the electronics will likely be the most expensive part of a device to develop, the plastic enclosure will be the most expensive to scale to manufacturing.
This is primarily due to the high cost of the injection molds. In fact, the mold cost is one of the biggest expenses when taking a product from concept to market.
Basics Of Injection Molding
Injection molding is an ancient technology that has been used since the late 1800’s. Injection molding machines incorporate a huge screw to force molten plastic into the mold at high pressure. This screw drive method was invented in 1946 and is still the method used today.
Injection molding machines definitely do not have the modern, high-tech feel of 3D printing technology. There is really nothing cool about injection molding, but nonetheless it is a requirement for most hardware products.
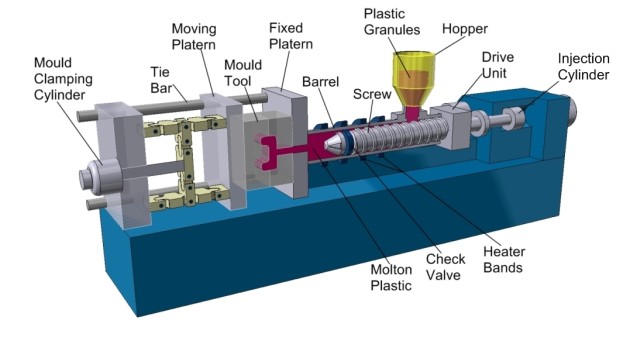
An injection mold consists of two halves that are forced together to form a cavity in the shape of the part to be produced. Hot, liquid plastic is then injected at high pressure into this cavity.
The high pressure is needed to ensure that the plastic resin fills in every crook and cranny of the mold cavity.
Once the plastic has had time to cool, the two halves of the mold are pulled apart, and the part is ejected.
Although designing for injection molding can be quite complicated, and the cost of the molds themselves are incredibly expensive, there is one huge reason why injection molding is still used today.
No technology can beat injection molding when it comes to producing millions of identical copies of a part at an incredibly low price.
Cost Of Molds
Injection molds are expensive, and you’ll most likely need a few of them, so their total cost can be quite significant. The more parts you need to produce with the mold the more expensive the mold.
This is because the mold must be designed to withstand incredibly harsh conditions. Over and over again a mold is subjected to high temperature and high pressure.
These two destructive forces act to quickly degrade the molds to the point of not producing parts of sufficient quality.
In order to tolerate this harsh environment injection molds are made from hard metals. The hardness of the metal required is typically determined by how many parts you plan to produce with the mold.
For example, a mold designed to produce 10,000 parts can be made of a much softer metal than a mold designed to produce 1 million parts.
Aluminum is a popular choice if you are producing less than 10,000 parts and works well for low volume production. Once you reach higher production volumes you will need to switch to a harder metal such as steel.
The harder the metal, the more difficult it is to make the mold, so the higher the cost. It also takes much longer to produce a mold from a hard steel. This is because molds are created by milling (i.e. carving) so a hard mold requires even harder milling tools.
If you’re an entrepreneur or boot-strapped startup with a small budget then you should definitely try to find a manufacturer that will agree to amortize your manufacturing tooling costs.
This means if your molds cost $25,000 then you could perhaps offer to pay the manufacturer back by paying them $1 extra per unit for the first 25,000 pieces produced.
Sure, this will cut into your unit profit but it’s the best financing method you can find in my opinion. It is infinitely more practical than financing your mold costs with a bank loan.
Design For Manufacturing
The high cost of the molds is only one of the issues with injection molding. The other downside to injection molding is that it greatly complicates, and restricts, the actual design of your plastic pieces.
Once you have a perfectly working prototype from a 3D printer, you then have to spend significantly more time and cost making it work for injection molding.
Keep in mind that you should design your plastic parts for injection molding from the beginning. Some requirements of injection molding, such as draft, can be delayed at least until your second prototype.
But other requirements, such as uniform wall thickness and undercuts, need to be implemented from the very start.
Draft
A main issue with injection molding is that your plastic parts have to be removed from the mold. Once the plastic has cooled, the two halves of the mold are opened and the newly formed plastic piece is removed.
For example, any 3D design for injection molding must incorporate draft. Draft simply means adding a slight angle to any surfaces that are parallel to the direction the part is pulled from the mold. In most cases 1 to 2 degrees is sufficient.
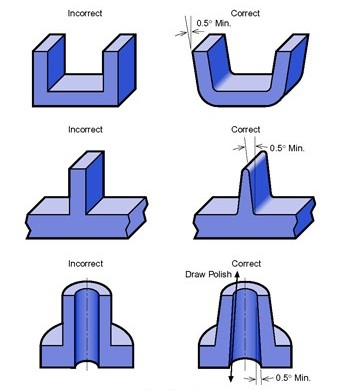
Some experts will tell you that you should include draft in your 3D model from the very start.
While I agree that incorporating draft is important to do early in the development process, I’ve found that it creates unnecessary complications with your first few prototypes.
I generally recommend adding draft once you have a high degree of confidence in your prototype. For most products this means adding draft after the first or second prototype version.
Ejector Pins
Ejector pins are used to remove the plastic parts from the mold. As the name implies, these are small cylindrical pins which push outwards to eject the part from the mold.
The location of the ejector pins is not trivial so you need to give some thought to their placement. Ideally, you want them to be located where your part is structurally strong to prevent the part from warping on ejection.
Secondly, the ejector pins tend to leave small marks on the product where they make contact. If you look closely at most plastic parts you will be able to see these tiny, circular indentations from the ejection process.
You want to design your product with this in mind. Strive to have these pins make contact with the part in places that are not critical for the appearance of your product. You may even try to hide the ejector pin marks under a label or logo.
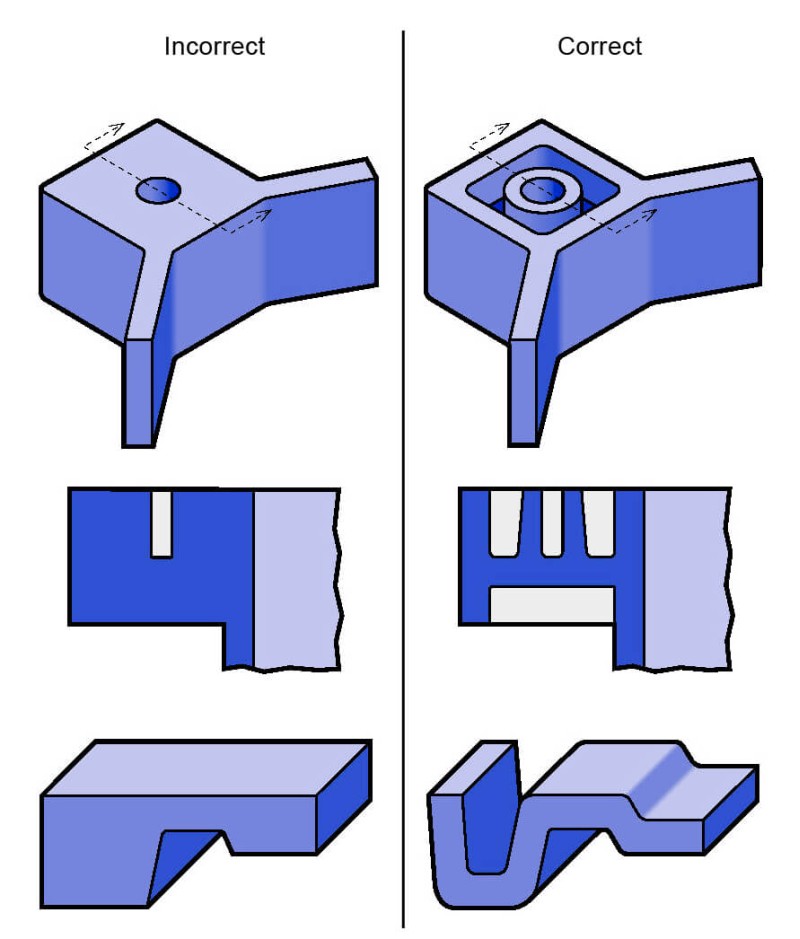
Side Actions
If you are unable to easily remove your plastic part from a simple two-piece mold you can use something called side actions.
Side actions are parts of the mold that are inserted during molding, then pulled out before the main mold sections are pulled apart. Their direction of movement is perpendicular to the pull director of the two main mold halves.
Try your hardest to avoid needing side actions, since they add considerable cost and complexity to the molds.
One of the main ways to eliminate side actions is by avoiding the design of undercuts. An undercut is a feature that prevents the part from being removed from the mold with a single pull.
Many times placing a slot underneath the feature will allow the use of a single pull mold instead of requiring side actions.
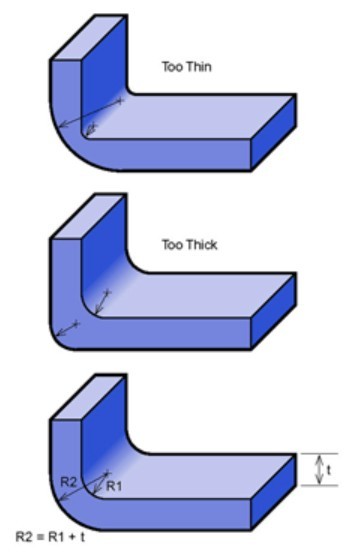
Uniform Wall Thickness
One aspect of injection molding that has a huge impact on your product design is the requirement for uniform wall thickness.
After injecting plastic into the mold it is essential that the plastic cools at a uniform rate. If cooling isn’t uniform the part may warp.
Therefore, when designing products for injection molding it’s key to use ribs instead of thicker sections. Designing a part that keeps a uniform wall thickness definitely takes some experience to do correctly.
Two of the most common errors made by 3D designers who don’t understand injection molding are using non-uniform wall thicknesses and requiring the use of side actions.
So make sure whoever does your 3D design knows not to make these rookie mistakes.
Radius/Chamfer Corners
Perfect corners and edges are not practical to achieve with injection molding. The hot resin simply can’t be forced with enough pressure into the mold to perfectly fill sharp edges. At least, not reliably over large production volumes.
Therefore, all edges and corners should be either rounded or chamfered to allow the resin to fill them more uniformly and consistently.
Cold Runners Versus Hot Runners
Runners is the term used for the channels incorporated into a mold for the hot resin to travel through to reach each cavity.
Larger runners allow the resin to flow more easily and at lower pressures. However, large channels require more time to cool and create more scrap, both of which impact the part cost.
Smaller runners, on the other hand, minimize cooling time, scrap, and ultimately part cost. The downside to small runners is the higher pressure required to force the hot resin to flow through them.
A solution that facilitates the use of small runners while also minimizing the required pressure is to use what are known as hot runners.
Small heating elements are incorporated into the mold near the runners so as to keep the resin more molten allowing it to flow more easily at lower pressure.
Nothing is ever free though, and the downside of hot runners is the additional mold complexity which always translates into additional costs.
In most cases, at least initially, you are best off using only runners without heating elements which are referred to as cold runners. Remember, always start with the simplest, lowest cost solution.
Parting Line
If you look close enough on any plastic part you’ll see what’s called a parting line. A parting line is found where the two mold halves meet.
This interface between the two halves is never perfect so a small amount of resin leaks out. This leakage usually gets worse as the mold ages and is worn down.
It’s critical that you plan where the parting line will be located on your product. You obviously want it to be placed ideally on a non-visible portion of your product.
Single-cavity / Multi-cavity
You can eventually decrease your molding time by using multiple cavity molds. This serves to increase your production speed and reduce your manufacturing part cost.
Multiple cavity molds allow you to produce multiple copies of your part with a single injection of plastic. But don’t jump into multiple cavity molds until you have worked through any tweaks or changes to your initial molds. It is wise to run at least several thousand units before upgrading to multiple cavity molds.
Entrepreneurs with a limited budget will want to maximize the use of single cavity molds unless you have a manufacturer financing your mold costs.
Family Molds
In most situations, you will need a separate mold for each custom plastic piece required for your product. At a minimum you’ll need at least two pieces: a topside and a bottom side.
But many, if not most, products require more than just two pieces of plastic. Molds are very expensive so the cost to purchase multiple molds is a huge financial obstacle.
You should always strive to design your product to minimize the number of unique custom plastic pieces required.
Another option to reduce the number of molds needed is through the use of a special type of multi-cavity mold called a family mold. A family mold allows you to consolidate multiple molds all into a single mold.
Whereas a typical multi-cavity mold creates multiple copies of the same part, a family mold creates different parts at one time.
Sounds great doesn’t it? Unfortunately, nothing is ever easy and every solution has tradeoffs. The main issue with family molds is they require each part to be pretty much the exact same size.
Otherwise, one part will fill up with resin before the other cavities. A family mold must be designed so all of the cavities fill up with resin at nearly the same rate.
That obviously limits their usefulness since it’s unlikely that all of the pieces needed for your product will be the same size.
Material Selection
There is an incredible variety of plastic resins at your disposal each with its own characteristics. Two of the most commonly used resins for hardware products are Polycarbonate (PC) and acrylonitrile butadiene styrene(ABS).
Polycarbonate has a much higher impact strength and has a much higher-quality appearance compared to ABS. However, PC is of course more expensive than ABS.
Polycarbonate is the most popular plastic used in higher end hardware products because of its higher impact strength and its better aesthetics.
If appearance is critical for your product then PC is most likely the way to go. If your product is low-cost then ABS may be the best choice.
Where To Mold?
Should you manufacture your plastic parts in your own country or in China? For most situations I think the best choice is to begin by manufacturing your parts in your own country (unless you live in a country with little to no manufacturing industry).
Then later, once your volumes increase above around 10,000 pieces, you can migrate to a Chinese manufacturer to reduce your costs.
China is fantastic for manufacturing at high volumes. However, development and debugging becomes much more difficult when done in China. You will be able to solve problems more quickly if you are manufacturing locally.
So work out all of the bugs locally, then transition to China.
Conclusion
This article is meant to be just a brief introduction to some of the challenges with injection molding. But for those that will be hiring out the 3D design for their product this is a good introduction.
As the founder, you don’t need to understand every minor technical detail of injection molding, but you do need a broad understanding of the technology and its complexities.
I suggest that when you hire a 3D designer you even quiz them on their knowledge of what you’ve learned in this article. First of all, be sure to ask them if they have experience with designing for injection molding.
Then I would ask them questions about how to prevent the need for side actions (avoiding undercuts), and if they understand that the part must be designed with uniform wall thickness.
Be sure to download your Ultimate Guide: How to Develop and Sell Your New Electronic Hardware Product.
This article was written by John Teel who is the founder of Predictable Designs, a company which helps guide entrepreneurs bringing new electronic products to market. John was formerly a microchip design engineer for Texas Instruments where he created electronic designs now used in millions of products. He is also a successful entrepreneur who developed his own hardware product that sold in hundreds of retail locations.