Why Peaks On Point Chose Laser Cutting To Create Its High-Quality, Custom Topographical Maps
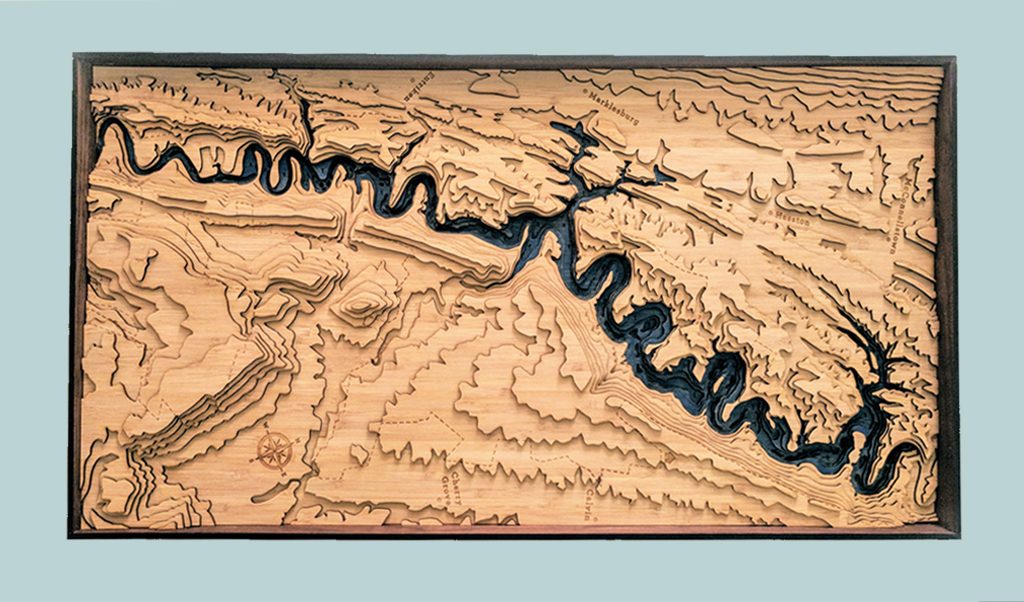
Timeline: December 2015. Colin Stuart needs a unique Christmas gift for his parents, and something generic from the mall just won’t do. So he puts on his creative cap and comes up with a plan: A laser cut topographical map of Okanagan Lake, British Columbia, Canada, where his mom and dad live.
It was a hit with his parents…and everyone else who saw it. With such positive feedback, he wanted to offer this kind of product to others who share his design aesthetic. That’s how Peaks On Point was born.
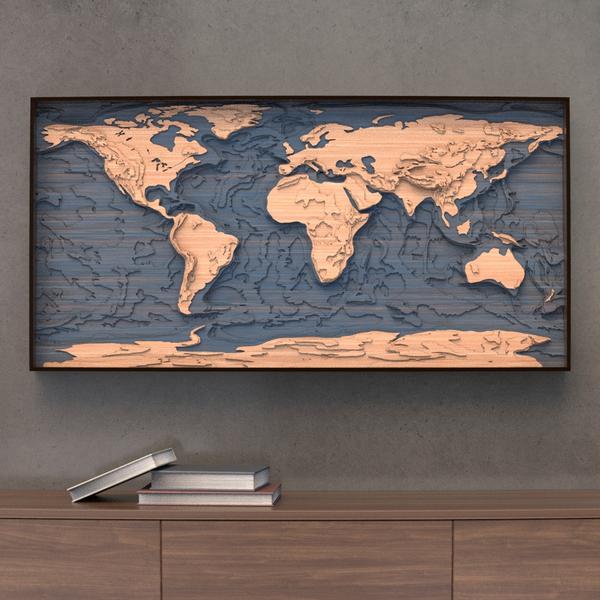
Today, Peaks offers 13 stock map designs—everything from the well-known Cape Cod, Massachusetts and Vancouver Island, British Columbia to the more obscure Pinecrest Lake, California.
“I am currently expanding my pre-designed offerings because they are less labor intensive, but the custom locations are by far the most popular product,” Colin says. “Each custom map undergoes a personalized design phase with the customer, including a digital mockup of what their final product will look like, before I build anything. I think this helps the customer better understand exactly what they are going to receive and gives them confidence in placing an order.
“In the future, I am looking to expand not only the range of available locations but to also have a variety of price points for different customers,” he continues. “I think I have an untapped market for simpler designs at a lower price.”
Venturing Into Mapmaking
Here’s the thing with laser cutting: People typically don’t just wake up one day and decide to laser cut artwork (although, theoretically that’s possible). The more likely scenario is that there’s a progression. Perhaps it’s from an engineering standpoint where other manufacturing options don’t work. Maybe it’s from a artistic angle where someone is looking for an unexpected means of creation.
So how did Colin get from a blank canvas to bringing intricate topographical maps to life? He’s always been interested in building, and everything changed in seventh grade when shop class became an option. He began working with sheet metal and eventually progressed into woodworking through the end of senior year. After high school, he even worked in a cabinet shop before starting art school where he refined his digital skills.
Currently, Colin spends his days as a digital artist at Minted working on image retouching and compositing, where he primary creates composited product images (combining photographed and digital assets) at a large scale using scripts and other tools. Then he spends weekends, evenings, late evenings and early mornings honing his craft for Peaks products.
“I considered 3D printing as an option, but the medium didn’t have the right aesthetic for something that would be hanging in a living room,” he says. “But I also wouldn’t have been able to achieve the intricately detailed pieces of wood required for these maps with any hand tools or a scroll saw. Thus, laser cutting was a perfect combination of my technical and artistic skills.”
Working With Ponoko
Once Colin determined that laser cutting was the way to go for his topographical maps, why did he choose Ponoko? “I had come across Ponoko a year or two before I ever used any services; I was intrigued but didn’t have any ideas at the time,” he says. “When I finally had a reason to do some laser cutting, Ponoko was the first place I checked. The instant quoting and amazing file upload system was almost entirely why I chose the service and is why I continue to use it to this day. Being able to instantly see my price and refine the files to cut costs is incredibly valuable to me.”
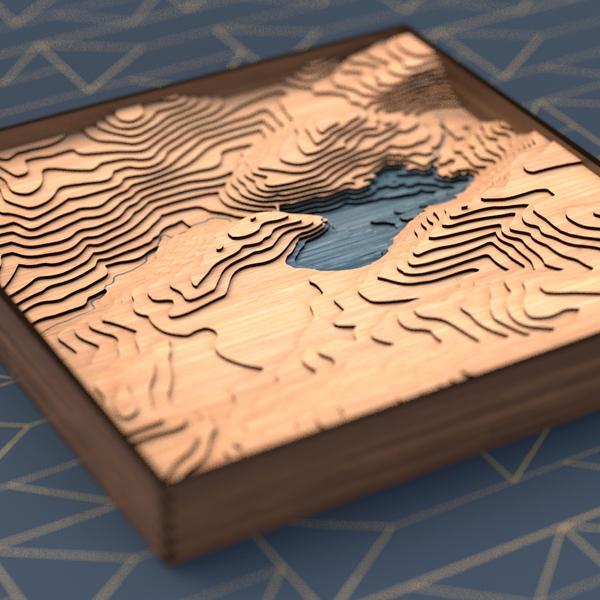
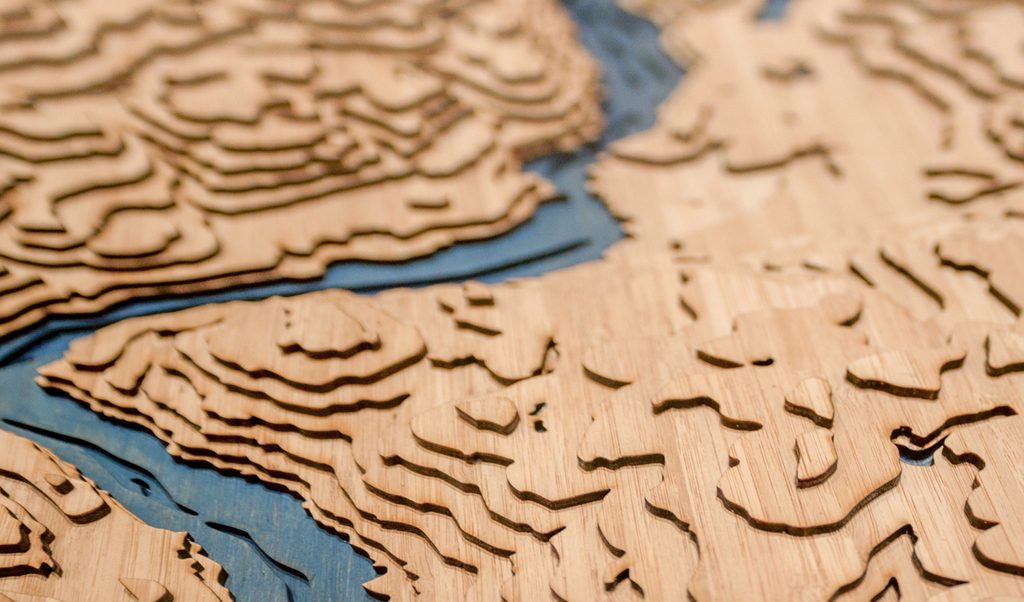
Since maps are all about highlighting terrain, Colin chose amber bamboo plywood to tap into the natural feel of the material. “I like the consistent figuring of the grain, and it has a good combination of strength without being too thick,” he explains. “I wanted to incorporate as many layers as possible on each map, typically including 12-18 layers depending on the terrain and water depth of the location. I plan to build prototypes using the new thin bamboo to see if I can double the amount of layers on a map.”
While the frames were originally made from the same bamboo and stained dark, there was a problem. “The strength of my construction was lacking,” Colin admits. “After a customer received a broken map in the mail, I switched to walnut veneer MDF that was much stronger and suitable for box/finger joints on the corners. This design was also much easier to put together, and it finished beautifully with Tung Oil.”
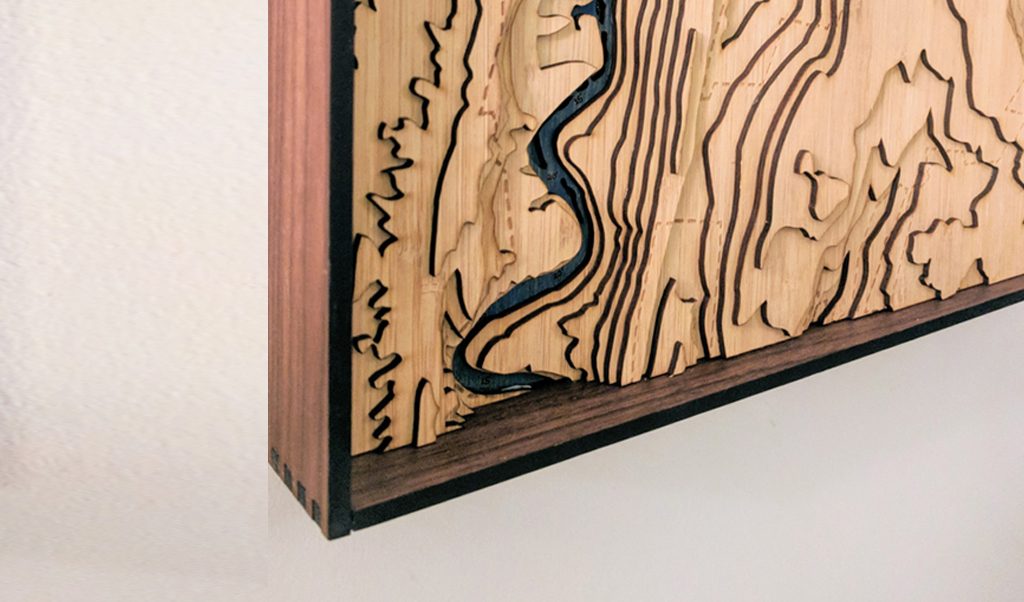
The back panel of each map is made from the thickest natural MDF for its strength and excellent engraving (the name of the location and Peaks branding is included on the back).
Refining The Process
Here’s another thing about laser cutting: There are always little ways to improve, whether with design elements to enhance appearance or through techniques (such as nesting) to save costs (an important consideration if you’re creating products to sell and want to maximize profits).
“Each time I order a map, I am able to subtly refine my process,” Colin says. “Over time, I have reduced my making costs by an average of 15% – 25%. I’ve also been able to build with higher quality due to the ability to quickly and cheaply iterate. Early maps were comparably flimsy and didn’t look like a professional product. Over a year or so, I was able to clean up my designs and tailor them to be easier to build.”
The biggest way Colin cut costs is by converting curved paths to straight lines. “First I add additional anchor points [Object > Path > Add Anchor Points] (usually doing this twice per curved path) and then simplify the path by removing the beziers [Object > Path > Simplify],” he says. “The result on the final product is pretty indistinguishable from a curved line and often saves me around $20 or more in making costs.”
Another cost-savings tip is to bulk order any pieces that are used often and/or in multiple designs. “For me, this is frame rails,” Colin says. “I can pre-finish and assemble frames much more efficiently when I am doing several at a time rather than on a per-order basis. It also helps me turn around individual orders more quickly.”
Being able to streamline any process so that you can reduce overall labor time is smart. Just make sure you’re not skipping important tasks. “Check your design files, and then check them again, and then check them again,” Colin emphasizes. “I have ruined a map by having a single layer shifted out of place by a few eighths of an inch and didn’t realize it until halfway through the build. These types of mistakes are really costly both in terms of dollars and in time.”
Anytime you have questions about files, whether before or after a project is made, Colin encourages you to reach out to the Ponoko team for guidance. “Any time I have had an issue with my file or needed make a last minute change I have been able to do so quickly and painlessly (shout outs to Dan and Shannon!),” he says. “And if you find a way to make your design cheaper after you have placed your order, get in touch with the Ponoko customer service team. They are amazing and will help you update your files after the fact.”
To learn more about the custom topographical maps Colin is building, check out the website and follow him on Instagram.

2 Comments
Thank you so much for the feature, I love it!
So do we! 😉 Thanks again Colin, it’s awesome to be a small part of your team.
Comments are closed.